The mask pattern I want to try comes from a company called EldenberryBlossoms. That's "Eldenberry" with an "n", no space, "Blossoms." This pattern is almost impossible to find using Google, so I will just tell you to go to the Facebook page for "EldenberryBlossoms Pattern Group," and ask to join the group. When you have been approved you will be given access to "Files" and you will be able to find the mask pattern there. I will call it the EB mask from here on.
The EB mask is similar to the fitted mask, but it uses something stretchy along the top and bottom edges. I was hoping this would help it to fit the face more snugly. Specifically, I am trying to address the problem of glasses fogging up.
I had previously made one Eldenberry mask using t-shirt strips. It turned out ok. I thought it might turn out better with Lycra.
Inevitably, you will find some aspect of the pattern that you want to change. For me, it was the ties. The pattern said the ties should be16-24". I thought that was a little short, since I make the ties 16" long on each side when I make other styles of mask.
In theory, the EB mask is an easy mask to make. You cut two outsides and two insides and two long 1½" Lycra strips. You sew the center seam on the inside and the outside. You machine hem the four side edges. You sew the tops and one Lycra strip together with a single seam, then repeat for the bottoms. Turn it right-side out and you are done. No top-stitching. Practically no ironing.
So why does it take a couple of hours to make one?
- Part of it is my perfectionism.
- Most of it is that it's hard to sew the long seams with the Lycra pieces. You have to stretch the Lycra while you are pinning/sewing. As soon as you let go, both the sewn and unsewn parts want to spring back and bunch up. The fabric wants to slip, and you end up with a seam allowance on the underside that might be too narrow. The stretching is uneven.
- Lycra is hard to cut into long strips.
- You might forget to hem the sides.
- It's harder than you'd expect to remove stitches from the Lycra and the stretched fabric.
 |
| Ta dah! |
With the EB mask pattern there is a slight difference between the top and the bottom of the mask. It is hard to see on a finished mask (or on an unfinished mask), but it makes a difference in how the mask fits. One way to deal with this is to use fabric with a directional print.
I do worry a little about the aqua mask. The blue Lycra was much stretchier than the black Lycra, and I may in fact have stretched it too much. I will have to wait for feedback from Spokane (where these two masks are headed).
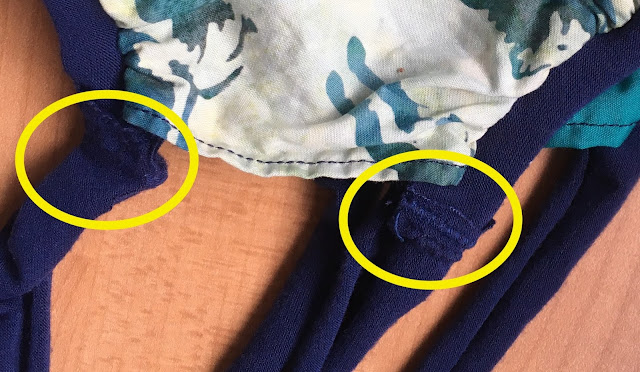
I made the rust-colored mask first, and I measured the Lycra without stretching it. My 24" ties seemed a little on the short side, so when I made the aqua mask I sewed two strips together to make longer ties. I used a stretch needle and a zigzag stitch to do this. As it turned out, the blue Lycra was so much stretchier than the black that it probably wasn't necessary to sew two strips together. But I didn't realize that until later.
So, I had a big lump where the two pieces of Lycra were sewn together. I decided to stretch the tie out so that the lump was not part of the seam. Instead, the lump was next to the fabric.
 |
| This is not a mask a perfectionist would make. |
If I do this again, I will try joining the ties with a diagonal seam.
I noticed a lot of tiny threads or beads of Lycra while I was working with it. I hope the ties won't continue to unravel over time.
On the plus side, I think these masks will fit their intended recipients well. The pattern comes in four adult sizes and three youth sizes.
The EB Mask gives you an automatic filter pocket. There is a template for filters in the Facebook "File" mentioned above.
I am going to withhold judgment on this mask until I get feedback from Spokane.
And just for fun, here are the two fitted masks that went out to Spokane in the same package.


Nice. But, you pin? No wonder it takes so long. LOL.
ReplyDelete