The quilt has three kinds of pieces: Blocks, Sashing Strips, and Cornerstones. I made them all, not without difficulty, and even started sewing them together. Now I am facing the prospect of doing most of them over.
Here are the Blocks:

These are the only pieces that worked out well. I made them to finish at 6". The blue inner square finished at 3".
I happen to have a number of sets of Marti Michell templates from Saturday Sampler classes I have taken. It turns out that Set A had all the templates I needed to make these 6 " blocks. Yay! Set A is called The 3" Basic Square Set. The set has more than three pieces, but I only needed these three:
I put little silicone circles on them. It makes them more stable when you are using them. Otherwise, they tend to slide around on the fabric.
 |
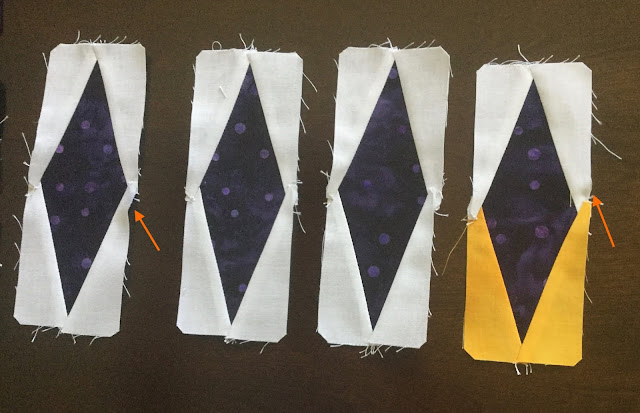
| The arrows show some of the worst areas of buckling |
The Sashing Strips are supposed to finish at 6" x 2". These were the hardest pieces. They were hard to cut and hard to sew. They ended up being too long, crooked, poorly aligned, buckled, cock-eyed . . . you name it. I thought I was being careful, but these pieces call for the very highest level of attention.
I pressed the seams away from the center and then realized you could see the seams through the fabric. I thought I was going to have redo all of them. I ripped out parts of the seams on one piece, and tried to press the seams toward the center until I realized that there would be an unacceptable problem with overlapping seams near the points.
 |
| Note the tiny holes for marking alignment. (I used small adhesive sandpaper circles to help stabilize the templates. Maybe I need a few more?) |
I didn't realize the Sashing Strips were too long until I had made all of them. A few of them might be okay. I thought maybe I could trim the ones that are too long, but I still have many that are crooked, buckled, and/or cock-eyed. How could this turn out so badly?
Do I try to re-use the pieces? Do I simply trim the ones that are too long? I don't know how much of my problem is a cutting problem, and how much is a sewing problem, so I think I had better cut out new pieces. Thank goodness I have lots of fabric.
And then there are the Cornerstones.
The Cornerstones need to finish at 2" x 2". I had to use the Pythagorean Theorem to figure out the size of the inner square. The outer square is 2" x 2" so the outer triangles have catheti of 1". That means the hypoteneuse is 1 . . . a squared + b squared = c squared . . .
the square root of two! Aha, it's 1.414! So that is going to be finished size of the inner square. So, add 1/4" for the seam allowance and it will be 1.664. No. I think I will need to add 1/2". Right? So it will be 1.914? How am I going to measure that? Can I round it to 2?
What about these really small templates in Set A? Wouldn't they be the right size? I think the template will give me a 2" square, not a 1.914" square. But it comes with Set A. It should work, right?
So, the first time I cut out the black triangles, I had the grain the wrong way. After I realized that, I cut out another set of black triangles, and sewed ALL the Cornerstones together. Yay! Almost done.
Then I laid everything out and started sewing rows together. After I sewed the first row together I realized it was too long. And I also realized that the Cornerstones were a little wider than the rest of the Sashing Strips. I measured and I thought and I looked at the pictures and the templates and the template instructions, and I finally was forced to accept the fact that these templates were never intended for the purpose I used them for. I didn't think 0.86 inches was a big deal, but it was. I should have known that. I did know that. I just got lazy. How do you measure such a small size anyway?
I found that we had an engineering ruler that had tenths of an inch. That helped me with my measuring. I made my own templates, a tiny bit smaller than the Set A templates. I made a few new Cornerstones and sewed them to some Sashing Strips. Much better! A whole row of pieces that are off by 0.86 turns out to be off by a really significant amount.
Now, do I rip out the seams, trim all the pieces, and re-sew, or just cut new pieces?
Sigh. I am so wilted.
Lessons Learned:
- Measuring matters. It REALLY matters.
- Measure before you sew ALL your pieces. Sew before you cut ALL your pieces.
- Don't be lazy. A tiny little discrepancy isn't going to go away. It is going to multiply.
- Always check the grain before you cut.
- Don't assume that just because templates come in the same set you can use them all in the same project.

