Showing posts with label half square triangle. Show all posts

Friday, November 27, 2020

Getting My Feet Wet, Thinking Local - Chester Creek, Week 1

There's a special feeling that comes with starting a new project. You have a clean slate and high expectations. I don't know what this quilt will look like - hence, the mystery - but I know it will be beautiful and I know the directions will be clear and precise and helpful.

My new project is Bonnie Hunter's 2020 Mystery Quilt-along. She has called it Grassy Creek, as she was inspired by a  creek of that name near her home in southern Virginia. Mine quilt is going to be called Chester Creek, for the creek nearest to me.

Screw you, Covid-19. I'm going to have fun staying at home and sewing. I have managed to get the fabric I need via mail-order (thank you Missouri Star), and I have put a new blade in my rotary cutter and would several bobbins. I even have new clips to keep the threads on my bobbins from unwinding. I have tried several different things to solve this problem and nothing has been satisfactory. I think these are going to work. 😊

The problem

The solution

What will Bonnie Hunter tell us to make first? Half-square triangles, using the golds and the greys! She offered several cutting methods. I chose to use the method which employs her Essential Triangle Tool. It seems to be the easiest.
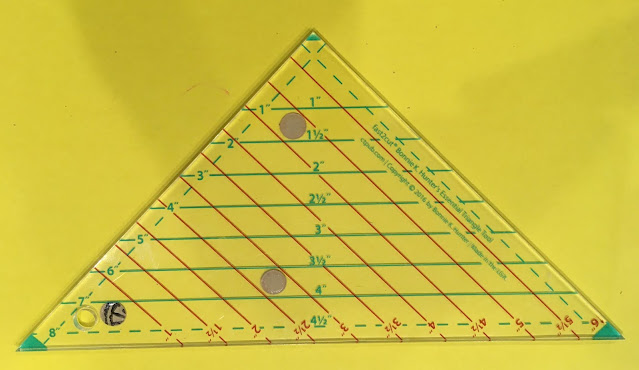
Essential Triangle Tool

I really like the Essential Triangle Tool, but I did notice that it tended to slip when cutting a stack of four strips. I decided to add some sandpaper dots, and that seemed to lessen the GC 1-5slippage.

Sandpaper dot closeup
 

Another problem I encountered was the difficulty of cutting relatively narrow strips from the ends of the various one-yard cuts of fabric I was working with. In the past, I have generally worked with 1/4-yard cuts and I did not have to worry about cutting such lengthy strips. But this year, I had to order from Missouri Star and they have a 1-yard minimum for yardage. If I did another quilt like this, I would probably cut the pieces into 1/4-yard cuts before starting.

My third challenge was getting the finished size right. Bonnie Hunter said the seams should be "scant," but I usually ended up with finished squares that were too large, so I just sewed my regular 1/4" seams - which was easier to do - and my pieces ended up correctly sized.

Despite these minor issues, I finished Part 1 easily, and the pieces ended up looking very nice.

Part 1 pieces

Ta da! (Clue) One and done!


Sunday, February 2, 2020

Endplay

Part 9

Whoa, Nellie! This is a part to end all parts. A clue of great consequence and substance. It is ten pages long. It is very complicated. There are lots of steps. 

But, this clue contains The Reveal. It is the Final Clue. Bonnie Hunter's brilliance and talent is also revealed. As if we didn't already know how good she is.

The first thing I had to do was cut out a lot of neutral squares. Then I had to cut out some neutral rectangles. Then some blue squares.  

The second thing I had to do was make four blocks (large four-patches, really) using the four-patches from Part 1 and the neutral squares from Part 9 and the HSTs from Part 4 which are now part of the mega-sets from Part 8.

The second step

The third thing I had to do was take the Flying Geese from Part 6 and the Flying Geese from Part 8 and sew them together. Bonnie Hunter cleverly designed this so that the seams would nest when you sew the Flying Geese together. I almost missed it, because I didn't read all of the directions when I made Part 6. I just assumed I knew how to press the seams. Fortunately, it was an easy fix. I just had to press the final seam on each piece in the opposite direction.

The third step

The fourth step involves sewing the four-patches, the Flying Geese, and the pinwheels together into a large nine-patch block. Wow! It looks great. It is amazing how it turned out with all of the aquas, blues, and raspberries matching up so easily. I was so pleased with how nicely all the points turned out and how flat the final block is. There are a few bulky seams, but Bonnie figured out how to keep the bulk to an absolute minimum. I love this star block.

The fourth step

There are several more steps in this final clue. I am not ready to go beyond the fourth step yet. I have to make all of the pieces for Parts 1 through 8 and  have to make quite a few more of these star blocks.

This is the end of the clues, but not even close to the end of my work. There will be more blog posts, but I suspect there will be longer gaps between them. I have had a lot of fun playing with fabric so far.

Friday, January 31, 2020

Playmates

Part 8
This clue has good news and bad news.

The bad news is: More Flying Geese. They will be raspberry, blue, and aqua (RBA, for short).

The good news is: No cutting! We are going to use pieces - but not all of them - from Part 4 (aqua QSTs) and Part 7 (raspberry and blue HSTs) to make RBA Flying Geese.

After sewing the RBA Flying Geese, I combined sets from earlier Parts to make two kinds of mega-sets. 
  • Type A has the green Flying Geese from Part 6, and the RBA Flying Geese I just made in Part 8, and the Pinwheels from Part 7, and the HSTs from Part 4. 
  • Type B consists of the green Flying Geese from Part 6, and unsewn RBA pieces from Part 4 and Part 7 that match the pieces I used to make RBA Flying Geese, and HSTs from Part 7 (i.e., the unsewn Pinwheel HSTs) and HSTs from Part 4.

It sounds very complicated. It was so complicated I forgot to take photos. But, it really wasn't as hard as it could have been, because the raspberry, blue, and aqua pieces within each mega-set matched! 

All of these pieces played so nicely together! And it's not too late to take photos now. Here are two of my Type A sets:


Monday, January 27, 2020

Play It Again, Ma'am

Part 7

For Part 7 I had to cut a lot of blue and raspberry Half Square Triangles. Then I had to sew half ot them together into squares, just like I did for Part 3 and Part 4 and Part 5. 

Oooohkaaaay. I can do that. But first I have to go to the fabric store and buy more raspberry fabric. I didn't get enough initially. And I didn't get enough different raspberry fabrics. I think this quilt will look better with more variety. That's one reason I don't make all of the pieces in a part (or clue) the first time through. If I end up getting more fabric later, I want to be able to distribute it evenly throughout the different parts. If I just plowed ahead and sewed all of the parts in each clue, I might run out of raspberry in Part 5 and the find out the shop where I bought it is now out, and I would get something different and then clue 7 would have only the new raspberry, and clues 1, 2, and 5 would not have any of the new raspberry, and it might not look good. It's possible it would still look good, but I don't want to take any chances.

The reasons I don't buy all the fabric in the first place so I can avoid running out are:

1) I am always hoping I will find another fabric that I love before I am too far along
2) The instructions don't usually specify how much is needed for each color

I might run out anyway because I made a mistake and wasted some fabric, or because the instructions were wrong, or  . . . . It happens.

These are some of the things that makes a mystery quilt interesting.

So, I was talking about making squares. After I made lots of squares, I had to take some of the squares and make them into pinwheels. 😾 I really don't like pinwheels. They are so hard. I can never get the points to meet in the center. There is always so much bulk in the center. Ugh.

I followed Bonnie Hunter's directions very carefully. I measured whenever she said to. Bonnie says to keep the line on the ruler up on the fabric, and I did. Bonnie says to allow for the fold in your measurement, and I did. Bonnie says to trim slivers using the Simple Folded Corners Ruler after you sew the squares, and I did.

And you know what? It worked. I am VERY pleased with how nicely my pinwheels turned out. They are flat, and the correct size, and the points meet in the center. Whooppeee! These are my best pinwheels ever.

Sunday, January 19, 2020

Double Play

Part 5
All I had to do was some half-square triangles. They are almost the same as the HSTs from Part 3. Easy peasy!

Part 6
Flying Geese. 😩 They are so much work. I always end up having to redo a lot of them. It's hard to keep the three parts aligned in a straight line.

The green fabric is finally making its debut now. It is going to be a "constant" fabric, so there is only one green fabric. I was beginning to wonder when we would use it. The green fabric will be cut into HSTs and combined with the blue QSTs from Part 4.

The blue QSTs are already in sets.That makes it easy to make the Flying Geese in sets.  Each finished set of Flying Geese has to be placed back into the group of pieces those blue QSTs came from. 

Once again, I made good use of the Essential Triangle Tool to cut my wing triangles from green strips. 
 
I had fewer redos[1] than I have had in the past. Maybe I am finally getting the hang of this.


[1] The Blogger editor doesn’t like redos. I looked it up and the internet thinks redos is the proper plural of redo, although redo's is also acceptable. Note, however, that when redo is a verb, redoes may be appropriate in the case of third-person usage. Note, also, that redo should not have a hyphen.


Even though I didn't have many redos, these pieces took forever. To make things worse, Bonnie slipped Part 6 in as a second part in a single week, so I also had half the expected amount of time to complete this part. I now understand that I am not going to catch up to the live mystery. Oh, well.

Wednesday, January 15, 2020

Play by Play

Part 3

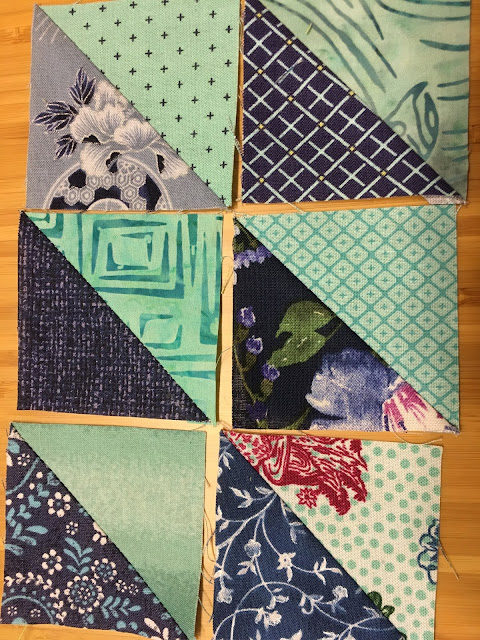
Part 3 of the Frolic! quilt calls for half-square triangles with a neutral fabric for one half and either dark blue or light blue for the other half. I used Bonnie Hunter's Essential Triangle Tool to cut the pieces from short (for greater variety) fabric strips. There are other methods for cutting half-square triangles, but I really like this method because it seems to minimize waste. It's also fast, because you can cut both halves of the square at the same time.
Some of my half-square triangles

Part 4

In Part 4 I finally got to use some of my aqua fabric. I found a really fun print that I am going to use as an aqua. I almost could have used it as a neutral. It has accents of raspberry, dark blue, and sage green (coming up eventually), and the pictures are soooo charming. (OK, so I realize they won't be that charming after I cut the fabric into a lot of little triangles, but I will know what was there.)

Part 4 was very complicated. I had to make a number of sets of blue and aqua. Each set has 4 half-square triangles, which I had to cut out and sew, and 4 blue quarter square triangles plus 4 aqua quarter square triangles, which I did not have to sew (yet). Each set can (and, for a scrappy look, should) be different, but the blue and aqua fabrics within a set have to be the same for all the pieces in the set.

I can't show you a picture of a complete set because I used certain elements of each set in a later part. Here are some of my completed HSTs. Each one is from a different set.


There is a way to cut out both the HSTs and QSTs from a single strip (if you are careful!) using the Essential Triangle Tool. I had to make some adjustments, but I was able to do it.
The Essential Triangle Tool

One aspect that was especially tricky was getting sufficient contrast between the aqua and the light blue. I like contrast a lot, and I wanted to have as much contrast as possible, so I tried to avoid certain combinations of aqua and light blue. I am probably going to end up with about 70 to 75% of my sets being made with dark blue, but I think I will like that. Here is a pairing that I made where I didn't love the contrast.

Here is a trick for studying contrast. Change your photo to black and white and see what the contrast looks like.


It's actually not as bad as I thought. 

But look at the contrast between aqua and dark blue. It is much stronger for the five dark blue HSTs than for the light blue one in the upper left corner.


I am going to trust Bonnie Hunter and keep some light blue in the quilt. What do you think?

Monday, December 10, 2018

Starting off on the Wrong Foot - Good Fortune, Part 3

This week's pieces are hard. You can link to Bonnie Hunter's Mystery Link-up here to see what the pieces are and how others have interpreted them. 

I sewed a few pieces and measured, as suggested. They seemed to be the correct size, so I began cutting like crazy. When I had cut some strips from each green fabric, I stopped and cut some neutral squares. This phase went quickly.

The next step, using the Bonus Buddy technique, involved marking two lines on the back of each neutral piece. The fabric kept sliding around on the table, so I grabbed a newspaper and put it under the fabric. This turned out to be a mistake because the newspaper ink sometimes came off on the fabric when I applied pressure to draw a line. It probably would have worked better to use my cutting mat, but I didn't want to get marks all over the mat. I'm going to try the mat, though.

I have a variety of marking tools. I tried a grey pencil, a dark blue pencil, and a pink merking pen. They all claim to be "washout" pens or pencils. I won't know until the quilt is all finished and I can throw it in the wash. (Maybe I can do a few test pieces right away. I still have to pre-wash my orange fabric, so I can throw it in with load.)

I wasn't sure how to pin the squares to the green strips. I could pin along the edges, or I could pin along the diagonal lines. For my first batch, I pinned along the edges. This probably wasn't the best choice. I ended up with corners that were not in the correct spot.
Changing my pinning method helped a lot but did not completely eliminate this problem.

I was having a lot of trouble sewing next to the pencil line per Bonnie Hunter's instructions. In my defense, I had a friend over, She brought her two daughters, who are learning to sew. There was a lot of talking going on. I might have been doing some of the talking. It was kind of distracting.

After sewing a number of pieces and thinking that it was very hard to see the line I was sewing next to, it dawned on me that I was using the wrong foot. I was using my quilting foot (1/4" seam foot) instead of a foot for regular sewing. I replaced it with my satin stitch foot and things got much easier. Easier, but not easy. I think I should try the zigzag foot, too.
L to R: zigzag foot, satin stitch foot, and 1/4" seam foot
I hardly got anything done. At the end of 4 hours I only had about a dozen of these half-chevron pieces finished. 


But I did get all the time-consuming stuff out of the way, and today I made excellent progress and got many more pieces done.

And, there is a surprise ending. When I ordered the Essential Triangle Tool, it came with a free Bonus Buddy Ruler. I have never used the Bonus Buddy Ruler, but I used it today. I am pleased to announce that, as a byproduct of using the Bonus Buddy method, I ended up with a bonus pile of little half square triangles (all finished !) which will be used later in this quilt!
Hooray for Bonus Units!

Lessons learned:
  • Test your marking pens and pencils to see if they really do wash out.
  • Use a cutting mat, not newspapers, for a base when marking small pieces of fabric.
  • Pinning matters. Pin on your sewing line, even if it is not along an edge.
  • Do not use a 1/4" seam foot on a diagonal seam.
  • Don't expect to get much done when you have friends over. 
  • Sew with friends from time to time. Use the occasion to show off your work. Problem-solve and brainstorm with another person who is really into sewing. Get the next generation hooked on sewing. Socialize. Don't be a hermit and spend all your time alone with a sewing machine. That's no fun.


Monday, December 3, 2018

Whole Lotta Shakin' Goin' On - Good Fortune, Part 2

December 3

We had a BIG EARTHQUAKE three days ago. It was a 7.0 on the Richter Scale. Our power was out for three hours. I didn't get much quilting done that day. Some of our stuff fell off shelves and broke, but luckily, fabric doesn't break.

I could say that I had to clean up the mess from all the papers sliding off both of our desks, along with a cup of coffee, so I didn't have time to sew, but that wouldn't be accurate. 

My husband's desk is usually very, very neat, but not after an earthquake.
I absolutely had time to sew - once the power came back on. After all, this was the day Clue #2 came out.

So I did get some of the half square triangles for Clue #2 done. I used the Essential Triangle Tool. The test pieces didn't come out quite the right size, but I trimmed them down and they were fine, and I vowed to be more careful with future pieces. Actually, I thought I was being very careful in the first place. Careful measuring, and careful cutting, and careful sewing.

As I went along, they did seem to become more accurate and they didn't require as much - or any - trimming. That's a good thing, because I really don't know what else I can do to make them the exact size they need to be. (Don't tell me to buy an AccuCut system. Too expensive. It really ought to be possible to do this without an expensive piece of equipment.) 


I did find a good article on half square triangles here: How to Make Half Square Triangles

Here's a link to Bonnie Hunter so you can see what other people did: Bonnie's Link-Up, Part 2

Lessons learned:
  • Don't leave piles of paper on your desk or on shelves or on top of filing cabinets
  • Probably not a good idea to leave your iron sitting up
  • Always unplug your sewing machine when you are done working. Who knows when there will be a power surge?
  • Don't cut all of your strips before you make your test pieces. You might decide to use a different HST method.


Tuesday, January 3, 2017

Facile et Rapide - En Provence Part Five (#2)

Week Two for me, Week Five for everyone following along with the mystery in real time.

This was an easy week because Christmas fell during the week. I just had to make a relatively small number of half-square triangles. I used Bonnie Hunter's Essential Triangle Tool and the cutting just flew along.

Here is the link to Bonnie's Link-Up.
It is so much fun to see what fabrics others have chosen.

Monday, December 21, 2015

Avanti! - Allietare Week Four

Avanti! Moving forward!

I was struck by Bonnie's photo of the striped church in Cinque Terre.

Here are a few of the photos we took of the magnificent cathedral in Orvieto, with that same distinctive black and white striping:


Did you notice the colors?


So. Week Four. Here is the link to Mystery Monday Link-Up Part 4.

I have completed half of the pieces I need. The seams didn't always match up well. I need to be more careful when sewing the half square triangles onto the trapezoids. I wasn't pinning them. It saved a lot of time, but sometimes the pieces slipped and I didn't notice. If I find any that are seriously out of alignment, I will redo them.

I used only one black fabric for all of the pieces. I did this because I misread the directions. I actually like the way it looks, so I'm glad.

Today - 5 hours and 28 minutes of daylight
Sunrise 10:14 am
Sunset  3:41 pm

Today we are turning the corner. Tomorrow we start gaining light!

Monday, December 14, 2015

Andiamo! - Allietare Week One

Andiamo! Let's go! Let's see if I can catch up to the weekly clues.

Bonnie Hunter recommends the Easy Angle Ruler and provides good instructions on how to use it. I acquired the ruler and it really made the cutting zip along like lightning. I liked it much better than the Marti Michell templates used in the BOM program I have been involved with.
It looks complicated, but it's really very easy to use
The clue for Week One seemed daunting. We had to make an awful lot of these half square triangles. It actually turned out to be easy, thanks to the Easy Angle Ruler, and it went very quickly, thanks to doing only 1/4 of the number specified in the clue.

Here are some of my squares:
Clue 1
Note that the gray is constant, but not the neutrals.

I kind of knew this already, but as I was sewing I became acutely conscious of the low quality of the Jo-Ann fabric. I really thought they would have better fabric in their quilting section. The fat quarters weren't any cheaper than those at a better quilt shop (before the coupons). The gray was fine, but the thread count on the neutrals is very low. I would have preferred something with a tighter weave. I'm not too worried about it because this project is unlikely to be subjected to a lot wear. But still.

Here is the link to the Allietare Link-Up page for Week 1, where you can see what others are doing: Allietare Week 1 Link-Up