Showing posts with label perfectionism. Show all posts

Monday, May 4, 2020

It's the Berries!


I was excited to get some Lycra-type fabric from Leah, because that is what the mask pattern I want to try next calls for. "Lycra" is a trademarked name, and I don't know if the fabric I got is actually Lycra, but I don't have another name for it. It is extremely stretchy.

The mask pattern I want to try comes from a company called EldenberryBlossoms. That's "Eldenberry" with an "n", no space, "Blossoms." This pattern is almost impossible to find using Google, so I will just tell you to go to the Facebook page for "EldenberryBlossoms Pattern Group," and ask to join the group. When you have been approved you will be given access to "Files" and you will be able to find the mask pattern there. I will call it the EB mask from here on.

The EB mask is similar to the fitted mask, but it uses something stretchy along the top and bottom edges. I was hoping this would help it to fit the face more snugly. Specifically, I am trying to address the problem of glasses fogging up.

I had previously made one Eldenberry mask using t-shirt strips. It turned out ok. I thought it might turn out better with Lycra.

Inevitably, you will find some aspect of the pattern that you want to change. For me, it was the ties. The pattern said the ties should be16-24". I thought that was a little short, since I make the ties 16" long on each side when I make other styles of mask.

In theory, the EB mask is an easy mask to make. You cut two outsides and two insides and two long 1½" Lycra strips. You sew the center seam on the inside and the outside. You machine hem the four side edges. You sew the tops and one  Lycra strip together with a single seam, then repeat for the bottoms. Turn it right-side out and you are done. No top-stitching. Practically no ironing.

So why does it take a couple of hours to make one? 
  • Part of it is my perfectionism. 
  • Most of it is that it's hard to sew the long seams with the Lycra pieces. You have to stretch the Lycra while you are pinning/sewing. As soon as you let go, both the sewn and unsewn parts want to spring back and bunch up. The fabric wants to slip, and you end up with a seam allowance on the underside that might be too narrow. The stretching is uneven. 
  • Lycra is hard to cut into long strips. 
  • You might forget to hem the sides. 
  • It's harder than you'd expect to remove stitches from the Lycra and the stretched fabric. 
And so on. It was berry frustrating.
Ta dah!


With the EB mask pattern there is a slight difference between the top and the bottom of the mask. It is hard to see on a finished mask (or on an unfinished mask), but it makes a difference in how the mask fits. One way to deal with this is to use fabric with a directional print.

I do worry a little about the aqua mask. The blue Lycra was much stretchier than the black Lycra, and I may in fact have stretched it too much. I will have to wait for feedback from Spokane (where these two masks are headed). 

I made the rust-colored mask first, and I measured the Lycra without stretching it. My 24" ties seemed a little on the short side, so when I made the aqua mask I sewed two strips together to make longer ties. I used a stretch needle and a zigzag stitch to do this. As it turned out, the blue Lycra was so much stretchier than the black that it probably wasn't necessary to sew two strips together. But I didn't realize that until later. 

So, I had a big lump where the two pieces of Lycra were sewn together. I decided to stretch the tie out so that the lump was not part of the seam. Instead, the lump was next to the fabric.
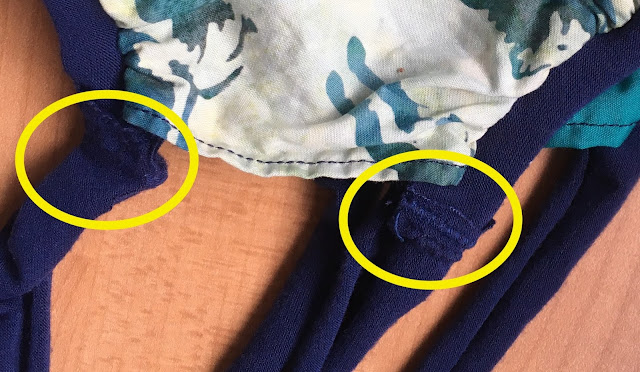
This is not a mask a perfectionist would make.

If I do this again, I will try joining the ties with a diagonal seam.

I noticed a lot of tiny threads or beads of Lycra while I was working with it. I hope the ties won't continue to unravel over time.

On the plus side, I think these masks will fit their intended recipients well. The pattern comes in four adult sizes and three youth sizes. 

The EB Mask gives you an automatic filter pocket. There is a template for filters in the Facebook "File" mentioned above.

I am going to withhold judgment on this mask until I get feedback from Spokane.

And just for fun, here are the two fitted masks that went out to Spokane in the same package.


Monday, November 26, 2018

I've Got This Covered! - Good Fortune, Part 1

Right before our long trip we had people over and I had to put all my sewing stuff away. We have been home for a week now and I am slowly starting to reclaim my sewing space. But not without a fight - from various inanimate objects.

I successfully pre-washed the red and neutral fabrics. The edges did fray, but not too badly.

I set up the ironing board and started to iron and soon realized that the pad that came with the ironing board needed to be replaced. I had ordered one a while ago, so I thought it would be a quick, easy job. But nothing about it was quick or easy. First, where was the pad? A lot of my sewing stuff was in our son's old bedroom. I pulled several large tubs out from under the bed and rummaged through them. No luck. I looked in all the cabinets in the laundry room. Nope. I looked in the basement where more sewing stuff resides. Nada. I finally located the new pad in one of those stackable plastic drawers in our son's bedroom. That must have taken about 45 minutes.😣

I have an extra-wide ironing board. It works better for quilting. It came with a small metal tray on the end that serves as an iron rest.
There is no space between the iron rest and the end of the ironing board. One would have to pull it out in order to replace the pad. I pulled as hard as I could, but it didn't budge. I turned the ironing upside down to look for the little lever that would release it. It was kind of dark, so I picked the board up and moved it over to an area with better light. There was no lever. Absolutely none.
I tried pulling on it some more. I tried it with the ironing board upside down.

If I could remember the brand of the ironing board or where I bought it maybe I could Google it for instructions on changing the pad. I ended up Googling "how to change ironing board pad" and wouldn't you know that several folks have made YouTube videos on this. But none of the videos had an ironing board with a metal tray on the end. They were just plain old ironing boards with plain old ironing board covers. Do you really need a video to show you how to do that?

Eventually I asked my husband to help me. He tried pulling on the iron rest. It wouldn't budge. He got a screwdriver and a hammer and applied some strategic taps and it started to move.😙 Once the stupid iron rest was loose it was very easy to put the lovely new cover on. I really like it. It's much fluffier than the old one and it even has a little pocket for the special measuring cup for filling up the iron or for snippers or for anything else that is usually in the way on top of the ironing board.
Another 45 minutes? At least.

So I ironed all of that pre-washed fabric and snipped off all of those loose threads and started cutting some strips.
I used my new ruler stickers to help me cut my strips. They worked like a dream to remind me what line I should be using.
 
Then I was ready to sew, so I had to get my dear, sweet sewing machine out. I had put it away before our trip because we had people over and then we had a house sitter, so it was better to leave it under its dust cover. I schlepped it across the house and put it on my sewing table. When I checked the thread I realized the spool holder thingy was missing. Oy! 😞 


I wondered if it was left behind when I put my machine away ten weeks ago. Could I have seen it later and stashed it somewhere for safekeeping? I looked through all of my sewing bins and baskets and all possible logical places to put a thing like that. Unsuccessfully. Then I decided to look some more in the sewing room. I looked under the baseboard heater. Then, in a moment of pure inspiration I spotted it on the carpet, behind the table leg. You could only see it if you really looked. I suspect it fell off when I took the cover off my sewing machine today and bounced off the table without making any noise. Is that possible? That was probably a 30-minute delay.

Fortunately, I had no further problems of this sort. I sewed a few sample pieces (four-patches, as it happens) and then measured them in accordance with Bonnie Hunter's instructions. They weren't as perfect as I wanted them to be, but I honestly wasn't sure what to do about it. I had measured carefully and cut carefully and pinned carefully and sewed carefully. I followed Bonnie's Instructions to the letter. Despite my best efforts some of the pieces had one square that stuck out a little. How can this be?

What I ended up doing last time was making about 5% extra pieces. If one turned out badly, I could throw it out and I'd still be ok. I think that's the easiest way to do this. I'm still going to be as careful as I can, but I'm not going to sweat it if a few pieces are less than perfect. I just won't use those. Yes, I've got this covered!
Some of my 4-patches

Link to Bonnie Hunter here: Bonnie's Link-Up, Part 1 and see what this looks like in all sorts of different colors. So much fun!

Lessons Learned:
  • When you are nesting two seams together, make sure they nest accurately all the way to the end.
  • Make 5% more than you need to allow for imperfections to be replaced.
  • Allow extra time to get set up for a big quilting project.
  • If a spool holder (or any other part) ever comes off your machine, always put it back where it belongs (on the machine) immediately.


Monday, December 11, 2017

On Ringo Lake, Part Three - In Over My Head

I did not quite finish the many pieces mandated for Week Two. I spent way too much time ripping out and re-doing. I had to re-sew 40 to 50% of my pieces because 1) I am a perfectionist, and 2) the pieces were slipping too much when I sewed them.  I tried pinning. It didn't help much. I tried using more pins. That only helped marginally.  I tried pinning more "strategically." I tried adjusting the presser foot. I tried sewing faster and sewing slower.  I don't know why this was so hard for me. The pieces were fairly small, and I think that magnified any discrepancies. Whatever the problem, it was very frustrating.

I told myself I would try another method when I finished using all the pieces I had already cut. I know I didn't have to do that. I could have just stopped using the already-cut pieces. I could have started to cut new pieces using a different method before I had used up all the old pieces. But I did not want to throw out perfectly usable pieces, so I just kept on keeping on.

When I finished up the pieces I had cut in advance, I switched to the Oversized Method. This method is described in the instructions that come with the Simple Folded Corners Ruler.  
This is what the Oversized Method yields, before trimming. I have drawn a blue box to show the trim lines. Notice how forgiving this method is.
Up to this point I had resisted the this method because I thought there would be a lot of wasted fabric. Once I started using the Oversized Method, and I began to understand it, it became clear that this method didn't waste any more fabric than the No Trim/Exact Size Method, which is the other method described in the instructions for the SFC Ruler. (If you really care about not wasting fabric, Bonnie Hunter also describes a no-waste method, using the Essential Triangle Tool, in the instructions for Week Two.)

I think I have found something that really works for me! Not only does the Oversizde Method seem to minimize ripping out seams and re-doing, I am finding that I can use it successfully WITHOUT ANY PINNING. And, as a bonus, it is not necessary to cut the corner pieces with extreme precision because you will be trimming them later. (You should still be fairly careful, but you don't have to be extraordinarily careful.) So I am getting my pieces done much faster.

That's a really good thing because Week Three's pieces also have folded corners, and there are even more pieces this week than last week. Here is your link to Week Three: On Ringo Lake, Part Three


Some of my finished pieces. How will they fit together?
I am also working very carefully with these pieces because I want to make sure I pay attention to the directionality. I am making twelve at a time so I can keep track of things.

Despite the method breakthrough I am still way behind on my Week Three pieces because I spent a lot of time on Friday visiting fabric shops. I needed more melon and neutral fabrics. I did well. I got more of one of the neutral fabrics I had bought as an experiment, and I got several new fabrics which either recently arrived or which I had previously overlooked. Whatever, I am happy! Pretty new fabrics!
I love this one so much I don't know if I can bring myself to cut it

Lessons Learned:
  • There may be more than one method to cut and sew a particular piece such as the Flying Geese
  • If one method isn't working well, or is a lot of work, keep trying other methods. I tried a total of four methods for Flying Geese.
  •  When you have a lot of interruptions, it is helpful to break complicated work down into bite-size pieces.