Showing posts with label template. Show all posts

Saturday, December 5, 2020

Red Sky at Night

Red sky at night - Sailors delight,

Red sky in morning - Sailors take warning!

 I finally finished it, and it's in the mail! 

I saw this panel in a quilt shop in Ketchikan, and I thought of our friends whose son attends the Coast Guard Academy, so I bought it for them. Then I got the idea that I could make it into a quilted wall hanging before I gave it to them. 

This project turned out to be a lot more complicated than I was expecting, because I had no directions for it. Ultimately, I decided to include three "Storm at Sea" blocks. Then I saw a quilt on Pinterest that had the "Starry Night" blocks, and I loved how they fit in with the theme of the quilt.

Just about every step presented a challenge. The panel was an odd size, so I had to figure out what size to make the blocks and the sashing pieces. Fortunately, I have a set of templates by Marti Michell called "Long Skinny Sashing Stars." I also used Marti's "Set A, The 3" Square Basic Set." My troubles and travails are detailed in my May 15, 2019 post, So Much to Wilt About. Let's just say I learned many important lessons before I was able to get all the moving parts synchronized.

I had to put in a dark red border around the panel. It was narrower on the top and bottom than on the sides, but that's the only way I could get the panel to fit.

My quilt buddy, Susan, came with me to The Quilt Tree to help me pick out the fabric, after I had the basic plan sketched out. The nice lady at The Quilt Tree helped me figure out how much of each fabric I needed. I think we did a good job! I still like the fabric a lot, despite all my frustrations with this unruly project.

This photo of the back gives a you a better idea of what the black batik on the outermost border on the front really looks like.


On the photo of the back you can also see the dark red binding (hand sewn), the hanging sleeve (made out of the blue-violet batik I used on the front), and the label.


If you squint, you can see some of the machine-quilting I did. I used a variegated blue thread. In retrospect, that turned out to be a poor choice. I went through so many quilting scenarios in my head. Most of them turned out to be too difficult for someone like me, so I ended up with something fairly simple.  I eventually realized that I did not need to be overly concerned with stabilizing the batting, since this will be a wall hanging. After much debating with myself, I determined that it would be best to leave the panel unquilted. It has a rubbery coating that would be very difficult to work with, and I couldn't settle on a good quilting plan for the panel (Outline the pictures? Geometric pattern?).

I ended up stitching-in-the-ditch around the blocks and the sashing. Then I did a free-hand serrated line of stitching in the outer black border to echo the serrated edge of the stamp in the panel. I wish it were visible in the photos.

Even the label was tricky. I had to think very carefully about the cleaning instructions. I was going to say "Dry Clean Only,"but the rubbery coating on the panel gave me pause. I think some of the ink/paint started to come off when I ironed it. I also had reason to think the yellow fabric might run. And I really didn't want the batting to shrink on this piece.

Lesson Learned: Don't do this again.


Wednesday, May 15, 2019

So Much to Wilt About

It is REALLY HARD to make a quilt without a pattern or directions. I have had so many problems. I have done a lot of work, but I am less far along than I was last time I posted.

The quilt has three kinds of pieces: Blocks, Sashing Strips, and Cornerstones. I made them all, not without difficulty, and even started sewing them together. Now I am facing the prospect of doing most of them over.

Here are the Blocks:


These are the only pieces that worked out well. I made them to finish at 6". The blue inner square finished at 3".  

I happen to have a number of sets of Marti Michell templates from Saturday Sampler classes I have taken. It turns out that Set A had all the templates I needed to make these 6 " blocks.  Yay! Set A is called The 3" Basic Square Set. The set has more than three pieces, but I only needed these three:
I put little silicone circles on them. It makes them more stable when you are using them. Otherwise, they tend to slide around on the fabric.

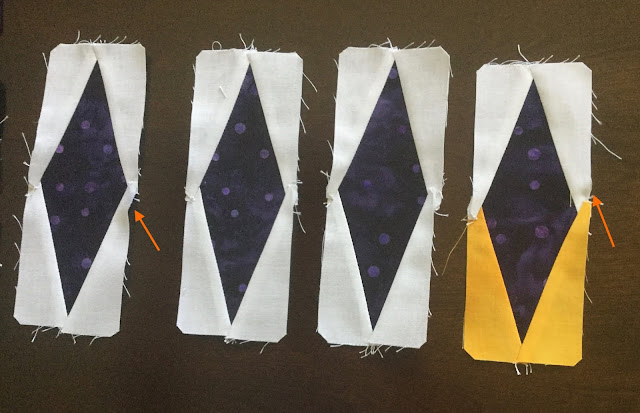
Here are some of my Sashing Strips:
The arrows show some of the worst areas of buckling

The Sashing Strips are supposed to finish at 6" x 2". These were the hardest pieces. They were hard to cut and hard to sew. They ended up being too long, crooked, poorly aligned, buckled, cock-eyed . . .  you name it. I thought I was being careful, but these pieces call for the very highest level of attention.

I pressed the seams away from the center and then realized you could see the seams through the fabric. I thought I was going to have redo all of them. I ripped out parts of the seams on one piece, and tried to press the seams toward the center until I realized that there would be an unacceptable problem with overlapping seams near the points.

I used Marti Michell's Long Skinny Sashing Star Set. I have no idea how to make the diamonds without some sort of template, but the Long Skinny Sashing Star templates are not easy to use. For example, to make the diamonds, you have to cut one side of the diamond, then flip the template around and cut the other side. You needed to make marks in two of those tiny pin-holes using a pencil, and then align the template on the pencil marks after you have flipped it.
Note the tiny holes for marking alignment.
(I used small adhesive sandpaper circles to help stabilize the templates. Maybe I need a few more?)

I didn't realize the Sashing Strips were too long until I had made all of them. A few of them might be okay. I thought maybe I could trim the ones that are too long, but I still have many that are crooked, buckled, and/or cock-eyed. How could this turn out so badly?

Do I try to re-use the pieces? Do I simply trim the ones that are too long? I don't know how much of my problem is a cutting problem, and how much is a sewing problem, so I think I had better cut out new pieces. Thank goodness I have lots of fabric.

And then there are the Cornerstones.
The Cornerstones need to finish at 2" x 2". I had to use the Pythagorean Theorem to figure out the size of the inner square. The outer square is 2" x 2" so the outer triangles have catheti of 1". That means the hypoteneuse is 1 . . . a squared + b squared = c squared . . .
the square root of two! Aha, it's 1.414! So that is going to be finished size of the inner square.  So, add 1/4" for the seam allowance and it will be 1.664. No. I think I will need to add 1/2". Right? So it will be 1.914? How am I going to measure that? Can I round it to 2?

What about these really small templates in Set A? Wouldn't they be the right size? I think the template will give me a 2" square, not a 1.914" square. But it comes with Set A. It should work, right?

So, the first time I cut out the black triangles, I had the grain the wrong way. After I realized that, I cut out another set of black triangles, and sewed ALL the Cornerstones together. Yay! Almost done.

Then I laid everything out and started sewing rows together. After I sewed the first row together I realized it was too long. And I also realized that the Cornerstones were a little wider than the rest of the Sashing Strips. I measured and I thought and I looked at the pictures and the templates and the template instructions, and I finally was forced to accept the fact that these templates were never intended for the purpose I used them for. I didn't think 0.86 inches was a big deal, but it was. I should have known that. I did know that. I just got lazy. How do you measure such a small size anyway?

I found that we had an engineering ruler that had tenths of an inch. That helped me with my measuring. I made my own templates, a tiny bit smaller than the Set A templates. I made a few new Cornerstones and sewed them to some Sashing Strips. Much better! A whole row of pieces that are off by 0.86 turns out to be off by a really significant amount.

Now, do I rip out the seams, trim all the pieces, and re-sew, or just cut new pieces?

Sigh. I am so wilted.

Lessons Learned:
  • Measuring matters. It REALLY matters.
  • Measure before you sew ALL your pieces. Sew before you cut ALL your pieces.
  • Don't be lazy. A tiny little discrepancy isn't going to go away. It is going to multiply.
  • Always check the grain before you cut.
  • Don't assume that just because templates come in the same set you can use them all in the same project.


Saturday, February 4, 2017

Difficile - En Provence Part Two (#4)

These pieces were hard.

I used the Tri Recs Rulers.

I preferred the Tri Recs Tools to the  Marti Michell templates. The fabric didn't move around as much while being cut. The Tri Recs Tools can be used to make many different sizes of the "triangle in a square" piece.
Tri Recs on the left, Marti Michell templates on the right.

Using these tools I was able to cut quickly and with relatively little waste. However, I ended up having to rip out and redo 10-20% of the pieces because of problems at the top of the neutral triangle. Either the pink pieces did not line up or the space between the tip of the neutral triangle and the top edge of the piece was too small.
I am picky about stuff like this.
 
Lessons Learned:

Take the time to pin these pieces before sewing, and make sure they don't slip around while you are sewing them.

Watch youtubes before using a new tool. I learned that the little notch on the tip of the right triangle (the Recs Tool) is a placement guide, and it makes your job infinitely easier.
 

Wednesday, December 16, 2015

Allegro! - Allietare Week Two

Allegro! Step lively!

I HAD to get some more fabric. You know how that goes. A big snowstorm was coming, so I needed to get to the store before the storm blocked all the roads. I have my priorities.

This time I went to a real quilt shop, and the fabric I got was of better quality.


I just flew through Week Two's clue. I used the Companion Ruler for easy-peasy cutting of the rhomboid pieces. I really like these templates so much better than Marti Michell's templates, especially for this type of cutting.  These templates are one-size-fits-all. With the Marti Michell templates, you have to buy another set for every size, and when you use them you end up needing a little revolving cutting mat because you are always turning your pieces around.

Here is what I made:


How are these pieces going to come together at the end of the mystery?

Here is the link to the Allietare Link-Up Page for Week Two: Allietare Week 2 Link-Up

Monday, December 14, 2015

Andiamo! - Allietare Week One

Andiamo! Let's go! Let's see if I can catch up to the weekly clues.

Bonnie Hunter recommends the Easy Angle Ruler and provides good instructions on how to use it. I acquired the ruler and it really made the cutting zip along like lightning. I liked it much better than the Marti Michell templates used in the BOM program I have been involved with.
It looks complicated, but it's really very easy to use
The clue for Week One seemed daunting. We had to make an awful lot of these half square triangles. It actually turned out to be easy, thanks to the Easy Angle Ruler, and it went very quickly, thanks to doing only 1/4 of the number specified in the clue.

Here are some of my squares:
Clue 1
Note that the gray is constant, but not the neutrals.

I kind of knew this already, but as I was sewing I became acutely conscious of the low quality of the Jo-Ann fabric. I really thought they would have better fabric in their quilting section. The fat quarters weren't any cheaper than those at a better quilt shop (before the coupons). The gray was fine, but the thread count on the neutrals is very low. I would have preferred something with a tighter weave. I'm not too worried about it because this project is unlikely to be subjected to a lot wear. But still.

Here is the link to the Allietare Link-Up page for Week 1, where you can see what others are doing: Allietare Week 1 Link-Up


Saturday, December 12, 2015

Palace Garden - November 2015 BOM

I'm almost done with this year's BOMs!

The block for November went relatively quickly. It is called Palace Garden. It does have the look of an aerial view of the type of formal garden one might see at a palace in Europe. 


What makes this month's block different is that it has a curved seam based on the curve used in the traditional Drunkard's Path pattern. This was my first time cutting and sewing such a seam. I had to make two templates and they weren't easy to use. It was very difficult to cut the curves with a rotary cutter, so I ended up cutting by hand with scissors. (It is interesting that you need two templates for the single curve. With your seam allowances, the two curves need to be different sizes.)

It was difficult and I don't like the result. I think you could do some nice designs with Drunkard's Path, but I don't like this one. This is a seven-patch block, so the quarter circles are intersected by a center cross. This flattens out the circle into more of a square with rounded corners, and I don't particularly like the the way that looks.

Here is a sample of a traditional Drunkard's Path, made by Tim Latimer and posted on his blog, Tim Latimer - Quilts etc 


Lessons learned:
  • Avoid curves.
  • If you think you have made a cutting mistake and run out of fabric, don't freak out. Don't run out to the store. Calm down and breathe. Maybe even wait overnight. When you come back to it, you may find that you did not make a mistake after all.

Friday, July 31, 2015

Dogwood Crossing - July 2015 BOM

The "kit" for this month's block contains the usual pieces of fabric and instructions.


Page 1
Page 2
Finally, we are back to some yellow and a lighter green.
The cutting this month was tricky. It was not a simple case of following the template. Some of the pieces called for two template cuts and one of the pieces had you using only a portion of the template.  Maybe that's why I couldn't get the pieces to line up properly.
Not a happy camper about this

If you look very closely at the photo above you will see that the cream colored background is not solid. It is a watercolor print with yellow accents, but the color gradations are so subtle that it's very hard to see. Why bother?

 I was able to force all of the other seams to line up, and by ripping out and resewing some of the seams, I was able to get the points to come out nicely.

Again, the problem with the directional print appears. I have learned from this.  :(

Lesson learned:

Lay it out before sewing. If I had done so, I would have then done a better job matching the green triangles to the green rhombuses, especially at the North and East positions on the ends of the green cross. This is not a place where you want contrast.
 

Wednesday, March 18, 2015

Coat of Arms - March 2015 BOM


I love the contrast on this block, but I am not thrilled with the way the print triangles look. Maybe I should have cut some extras so I could get four that are going in the same direction.

Lessons learned:
1. Be careful about choosing a directional print.
2. As long as you have enough fabric, there's no rule against cutting extra pieces. 
 
For this year's project we are using Template Set L, The 12" Seven-Patch Block Set.

Why is it called Seven-Patch? Seven-Patch quilt blocks are assembled with a grid of seven squares across and seven squares down. Seven-Patch quilt block grids are not usually subdivided to create additional units. A thank-you to Janet Wickell and About.com for this explanation. I couldn't see the seven squares before it was pointed out to me.

There is a lot more information inside this pamphlet, along with ideas for making 7-patch blocks.

Pieces 68, 69 and 71 have sandpaper grippers. Piece 70 has silicone.
I added little grippers to the backs of the templates. I found that they slide around too much without them. I tried silicone grippers and sandpaper grippers. I didn't like the silicone ones. They elevated the template too much, and sometimes the rotary cutter would actually angle in under the template a little bit and I wouldn't get an accurate cut. The sandpaper works very well.