Showing posts with label monogram. Show all posts

Sunday, December 13, 2015

Mug Rug Hugs

I am continuing to cannibalize The Secret Garden. This time I am using it to make mug rugs for some dear friends I will be seeing in January. The entire project was made using leftovers and scraps. I didn't even have to buy the thread.

Here is where I started:
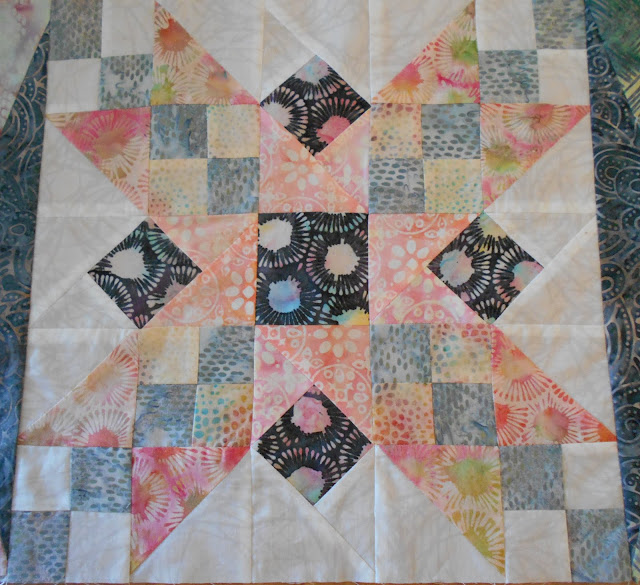

Rocky Mountain Four-Patch Chain block from The Secret Garden.

I ripped out a few seams in this block to remove the four corner squares, which were the perfect size for mug rugs. I then sewed the four cross-pieces together in pairs to make two more squares, and I had the makings of 6 mug rugs.

This project turned out to be a big learning process for me (that's a good thing). I didn't have any directions to follow, so I had to wing it, using what I had learned from other projects. I did a lot of ripping out, but in the end, I let some imperfections go. It was hard to do, but I kept telling myself:
  1. Nobody will notice
  2. Nobody will care
  3. I am being too much of a perfectionist
  4. I have already spent way too much time on this
  5. Why do they have to be perfect anyway?
I used my machine's monogramming capability. It doesn't look as nice as the results you get from a machine with a true embroidery feature, but I wanted a machine that is designed primarily for quilting. I only had to rip out half a monogram. I guess I learned something from my earlier attempts to make labels. It occurred to me, after the fact, that stabilizer might be a good way to go here.

For the actual quilting I tried some straight line quilting, parallel to the "ditch" lines, about 1/4" out. It looked terrible on the back (the side with the monogramming) because it crossed over the monogramming.

Next I tried a stippling or meandering pattern for the free-motion quilting. After doing three I decided I really didn't like the way it looked. In the end I went with a loopy pattern. I have not used this before, but I liked the way it looked. Instead of quilting it from the pieced side, I quilted from the monogrammed side, making sure not to quilt over the monogram.
Loopy quilting
The backing fabric is left over from from some yardage I bought to use in the piecing on the front. The coral backing fabric appears on the patchwork front of some of the pieces. A black companion fabric appears on the front of other pieces. I really like this fabric. The black was provided in the original BOM kits, and I was excited when I found the same 
print in coral.
 
For the binding, I was going to do it the easy way - attach to the back and machine-sew on the front, close to the edge. This looked terrible with white thread. I didn't want to try it with coral thread in the bobbin because I had been experiencing tension problems all through this project and I thought it would look really bad with two different colors if the tension was even the tiniest bit off. 

So, I just sewed the front of the binding down by hand. The white thread shows up too much for my taste, but at the end of a project I always have less patience for ripping out. If I had thought about it, I would have machine-sewn the binding onto the front and hand-sewn it on the back, perhaps using coral thread.
And here they are! I will be making a total of 8.


Lessons learned:
  • Use a stabilizer when monogramming. (I did not.)
  • Don't quilt through monogramming.
  • Thread should match binding. 
  • Take tiny stitches when hand-sewing the binding.
  • Think carefully about whether to attach the binding to front or back, especially if you change your mind about method. 
  • It's harder to do free-motion quilting on a tiny piece than on a fairly large piece.

Tuesday, December 1, 2015

Sea Grass

 In August I took a class with Rayna Gilman. On the second day our challenge was to make something with a limited color palette: two neutrals and a color. Read my blog about the class here: Kiwi, Anyone?

 I selected some fabrics - whites, grays, and greens. (The color is a little off in this photo.)

I sewed the strips together and flipped the piece around.


I squared up the piece. It was a little longer on one edge than the other so it did not lie flat.
After sitting in my sewing area for a suitable length of time, my project demanded to be finished. I tweaked it by narrowing a few of the pieces that were too wide at one end, and managed to beat it into a more one-dimensional piece. I decided to use the print from the focus pieces for the backing. (I have also been using this print for the focus pieces in the 2015 BOMs.)

Then I spent some time thinking about how to quilt it. At first I thought I would quilt only on the light colored stripes, or only on alternating strips. In the end, the focus print also supplied my inspiration for the actual quilting of the project. 

The fabric also gave me the idea to use a variegated thread for the quilting.


Initially I did not plan to have so many lines of quilting, but I just kept filling in blank areas, and in the end, I liked the densely quilted result.
Voila! (Did you notice that it got flipped around again?)

After completing the quilting, I made a facing using the same old focus fabric. (I made the label before sewing on the facing this time :)). It turned out much better than last time, and I only had to do the monogramming once, but it is still a little uneven. The variegated thread looked awful on my test label, so I went with a solid green. I wish I had used the solid green to hem the facing down, but I was too lazy to rip it out and redo it. Besides, it's only on the back, right?


I really like how this turned out. I like it a lot better than "Slice and Dice." I am going to have to try the "two neutrals and a color" idea again.

One last observation . . . As I walked through the living room holding my finished project, it suddenly dawned on me that it looked a lot like our Steve Gordon painting . . . which is my favorite piece in our house! Could I have been influenced subliminally to echo the "look and feel" of the Steve Gordon?


Lessons learned:
  • After squaring off and adding facings, the project will be smaller than expected - in this case, about 10" x 17 1/2". Keep this in mind when you start the project.
  • Plan ahead with regard to when to use variegated thread and when not to.
  • Don't use fusible web to add focus pieces, if you can avoid it. If you are adding the focus pieces at the end, would appliqué look better?


Sunday, November 15, 2015

Slice and Dice, Part 2

My first "art quilt" is finished. I really think of it as a practice piece more than anything. I learned several new techniques doing this project, and it was fun. The most amazing thing I learned was that it is possible to make a quilt without following any of the rules!
Ta da!
After I finished quilting the piece, I spent some time thinking about how to finish it. I thought that if I used a print for the binding it would look too busy. If I used a solid color, it would take away from the dramatic effect of the purple horizontal lines. My friend, Nan, had mentioned facing to me as another method of finishing. I decided to try it.

I spent a few days thinking about what fabric to use for the facing. Unfortunately, I didn't have enough of the backing fabric left for the facing. I wanted to find something that would co-ordinate nicely with the backing fabric - probably a solid. I wasn't convinced that it would look good to have a wide solid border around the back, but I told myself it would be on the back, not the front, so it would be okay.

As I was about to run over to the fabric store, I was struck by an inspiration. What if I used pieces of The Secret Garden for the facing? I had used it for the front, so why shouldn't I use it on the back? I didn't have to go to the fabric store after all!

I made the facing, and sewed it down by hand with a blind hem. It resulted in a rather thick edge, but it actually gives the piece a little more stability, so it is not a problem for this type of project.

I wanted to try out the monogramming function on my new machine, so I decided to add some monogramming to the facing instead of making a label. I thought maybe I would do it after the facing was sewn onto the edge. I don't know why. I think I was worried about placement if I did it before adding the facing to the piece. That was probably not the best way to approach it.
The back, with facing
I stitched a sample of the title, and it looked okay, so I stitched it on the facing. (Well, to be honest, it looked "okayish." My machine is not one of those embroidery machines. It can do monogramming, but it is not terrific.) As I was adding the monogram to the facing, it looked like the fabric was not feeding through the machine in a straight line, so I pulled on it a little to keep the letters in a straight line. Hah! That was a bad idea. The letters got scrunched up and turned out too close together. I had to do it over three times. It was a real pain to rip out the monogramming, but I didn't want to have to rip out the seam holding the facing on. It didn't come out as straight as I would have liked, and the fabric had some holes in it where I had ripped out the monogramming, but it's only the back, right?
Then I added my name and date to the other side.
After finishing the facing I started thinking about whether I should make a hanging sleeve, and how. Alas, my research revealed that it is better to think about this before you sew on the facing. Oh, well. Live and learn. 

Now that I know what I am doing (sort of), I will think more carefully about what fabrics I will use before starting a future piece.

Lessons learned:
  • When you select a backing, make sure you have enough for a facing or binding, or else have a clear idea of what you will use.
  • Plan your hanging sleeve BEFORE you do the facing or binding.
  • Practice the monogramming, and don't try to pull it straight if it seems to be going crooked.
  • Think outside the box!