Showing posts with label rotary cutter. Show all posts

Monday, December 24, 2018

Essential Geometry - Good Fortune, Part 5


I decided I really don't like that blue-and-white-cracked-eggshell fabric. I probably won't use it any more in this quilt. The blue-on-blue-cracked -eggshell doesn't bother me, though.
This week we made squares out of triangles. Two small triangles (neutral and orange) to make a larger triangle, and then the resulting triangle plus a larger blue triangle to make a square - three triangles total. I had to make half of the squares in a mirror image layout, so it did involve a little thinking.

I used my rotary cutter a lot. I think I might need a new blade, even though I put a new blade in when I started this Good Fortune project. I googled this and the consensus seems to be that a blade will last for one quilt/project, so I'm going to keep going with the same blade for now.

Overall, this week's assignment went more slowly than I was expecting. Cutting had to be very precise, as did the sewing. (Did I develop some bad habits during string piecing?) I used the Essential Triangle Tool, though other methods were also included in the instructions.

An extra step, not on Bonnie Hunter's directions: I had to trim each finished square. They were all a tiny bit large. I also had about a 10% do-over rate for square or triangles I just wasn't satisfied with.

I have finished about 1/4 of the required pieces, and I have another 1/4 partially finished. Here is a link to Bonnie's Mystery Link-up, Part 5 to see all the fun colors that others have chosen and all the fun fabrics that those of using Bonnie's colors have found.


Lessons learned:
  • When cutting out triangles, the direction of your cut makes a difference. Start at the "skinny" end. If you start at the other end, the fabric will move when you get to the skinny end.

Saturday, December 12, 2015

Palace Garden - November 2015 BOM

I'm almost done with this year's BOMs!

The block for November went relatively quickly. It is called Palace Garden. It does have the look of an aerial view of the type of formal garden one might see at a palace in Europe. 


What makes this month's block different is that it has a curved seam based on the curve used in the traditional Drunkard's Path pattern. This was my first time cutting and sewing such a seam. I had to make two templates and they weren't easy to use. It was very difficult to cut the curves with a rotary cutter, so I ended up cutting by hand with scissors. (It is interesting that you need two templates for the single curve. With your seam allowances, the two curves need to be different sizes.)

It was difficult and I don't like the result. I think you could do some nice designs with Drunkard's Path, but I don't like this one. This is a seven-patch block, so the quarter circles are intersected by a center cross. This flattens out the circle into more of a square with rounded corners, and I don't particularly like the the way that looks.

Here is a sample of a traditional Drunkard's Path, made by Tim Latimer and posted on his blog, Tim Latimer - Quilts etc 


Lessons learned:
  • Avoid curves.
  • If you think you have made a cutting mistake and run out of fabric, don't freak out. Don't run out to the store. Calm down and breathe. Maybe even wait overnight. When you come back to it, you may find that you did not make a mistake after all.

Wednesday, March 18, 2015

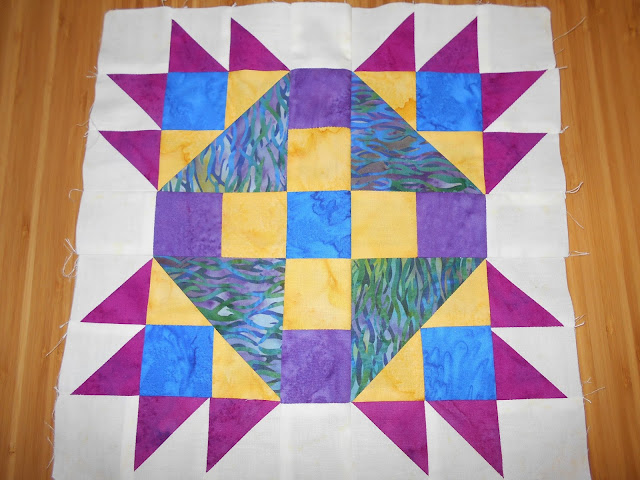
Coat of Arms - March 2015 BOM


I love the contrast on this block, but I am not thrilled with the way the print triangles look. Maybe I should have cut some extras so I could get four that are going in the same direction.

Lessons learned:
1. Be careful about choosing a directional print.
2. As long as you have enough fabric, there's no rule against cutting extra pieces. 
 
For this year's project we are using Template Set L, The 12" Seven-Patch Block Set.

Why is it called Seven-Patch? Seven-Patch quilt blocks are assembled with a grid of seven squares across and seven squares down. Seven-Patch quilt block grids are not usually subdivided to create additional units. A thank-you to Janet Wickell and About.com for this explanation. I couldn't see the seven squares before it was pointed out to me.

There is a lot more information inside this pamphlet, along with ideas for making 7-patch blocks.

Pieces 68, 69 and 71 have sandpaper grippers. Piece 70 has silicone.
I added little grippers to the backs of the templates. I found that they slide around too much without them. I tried silicone grippers and sandpaper grippers. I didn't like the silicone ones. They elevated the template too much, and sometimes the rotary cutter would actually angle in under the template a little bit and I wouldn't get an accurate cut. The sandpaper works very well.