Wednesday, May 15, 2019

So Much to Wilt About

It is REALLY HARD to make a quilt without a pattern or directions. I have had so many problems. I have done a lot of work, but I am less far along than I was last time I posted.

The quilt has three kinds of pieces: Blocks, Sashing Strips, and Cornerstones. I made them all, not without difficulty, and even started sewing them together. Now I am facing the prospect of doing most of them over.

Here are the Blocks:


These are the only pieces that worked out well. I made them to finish at 6". The blue inner square finished at 3".  

I happen to have a number of sets of Marti Michell templates from Saturday Sampler classes I have taken. It turns out that Set A had all the templates I needed to make these 6 " blocks.  Yay! Set A is called The 3" Basic Square Set. The set has more than three pieces, but I only needed these three:
I put little silicone circles on them. It makes them more stable when you are using them. Otherwise, they tend to slide around on the fabric.
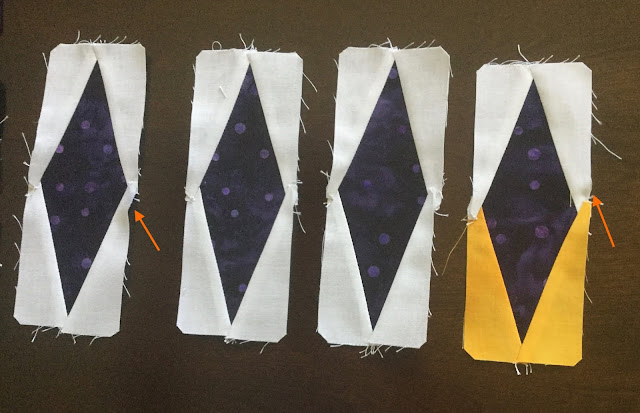
Here are some of my Sashing Strips:
The arrows show some of the worst areas of buckling

The Sashing Strips are supposed to finish at 6" x 2". These were the hardest pieces. They were hard to cut and hard to sew. They ended up being too long, crooked, poorly aligned, buckled, cock-eyed . . .  you name it. I thought I was being careful, but these pieces call for the very highest level of attention.

I pressed the seams away from the center and then realized you could see the seams through the fabric. I thought I was going to have redo all of them. I ripped out parts of the seams on one piece, and tried to press the seams toward the center until I realized that there would be an unacceptable problem with overlapping seams near the points.

I used Marti Michell's Long Skinny Sashing Star Set. I have no idea how to make the diamonds without some sort of template, but the Long Skinny Sashing Star templates are not easy to use. For example, to make the diamonds, you have to cut one side of the diamond, then flip the template around and cut the other side. You needed to make marks in two of those tiny pin-holes using a pencil, and then align the template on the pencil marks after you have flipped it.
Note the tiny holes for marking alignment.
(I used small adhesive sandpaper circles to help stabilize the templates. Maybe I need a few more?)

I didn't realize the Sashing Strips were too long until I had made all of them. A few of them might be okay. I thought maybe I could trim the ones that are too long, but I still have many that are crooked, buckled, and/or cock-eyed. How could this turn out so badly?

Do I try to re-use the pieces? Do I simply trim the ones that are too long? I don't know how much of my problem is a cutting problem, and how much is a sewing problem, so I think I had better cut out new pieces. Thank goodness I have lots of fabric.

And then there are the Cornerstones.
The Cornerstones need to finish at 2" x 2". I had to use the Pythagorean Theorem to figure out the size of the inner square. The outer square is 2" x 2" so the outer triangles have catheti of 1". That means the hypoteneuse is 1 . . . a squared + b squared = c squared . . .
the square root of two! Aha, it's 1.414! So that is going to be finished size of the inner square.  So, add 1/4" for the seam allowance and it will be 1.664. No. I think I will need to add 1/2". Right? So it will be 1.914? How am I going to measure that? Can I round it to 2?

What about these really small templates in Set A? Wouldn't they be the right size? I think the template will give me a 2" square, not a 1.914" square. But it comes with Set A. It should work, right?

So, the first time I cut out the black triangles, I had the grain the wrong way. After I realized that, I cut out another set of black triangles, and sewed ALL the Cornerstones together. Yay! Almost done.

Then I laid everything out and started sewing rows together. After I sewed the first row together I realized it was too long. And I also realized that the Cornerstones were a little wider than the rest of the Sashing Strips. I measured and I thought and I looked at the pictures and the templates and the template instructions, and I finally was forced to accept the fact that these templates were never intended for the purpose I used them for. I didn't think 0.86 inches was a big deal, but it was. I should have known that. I did know that. I just got lazy. How do you measure such a small size anyway?

I found that we had an engineering ruler that had tenths of an inch. That helped me with my measuring. I made my own templates, a tiny bit smaller than the Set A templates. I made a few new Cornerstones and sewed them to some Sashing Strips. Much better! A whole row of pieces that are off by 0.86 turns out to be off by a really significant amount.

Now, do I rip out the seams, trim all the pieces, and re-sew, or just cut new pieces?

Sigh. I am so wilted.

Lessons Learned:
  • Measuring matters. It REALLY matters.
  • Measure before you sew ALL your pieces. Sew before you cut ALL your pieces.
  • Don't be lazy. A tiny little discrepancy isn't going to go away. It is going to multiply.
  • Always check the grain before you cut.
  • Don't assume that just because templates come in the same set you can use them all in the same project.


Tuesday, April 23, 2019

Friends with Sewing Machines

What better way to spend a snowy holiday Sunday than sewing with friends? I have a new project and I needed a little push to get started so it was the perfect time for a Sewing Day.

I am making a wall hanging as a gift for some friends. It's sort of a surprise so I'm not going to say too much about it yet. It is based on a printed panel I bought. The panel came without any pattern or suggestion or idea for what to do with it. I spent some time surfing the internet and I was able to come up with a plan.

The panel has a nautical theme, and I found that there is a traditional quilt block called "Storm at Sea." I am going to place three Storm at Sea blocks underneath the panel and then put coordinating sashing around the panel and between and around the blocks. My inspiration came from this wall hanging I found on Pinterest. I knew right away it would be perfect. I don't know who made it.

Fortunately, Susan M agreed to meet me at the fabric store to help me pick out fabric. Actually, she insisted on being there. I'm glad she came because it was so helpful to have her input. She has such a good eye for color. She also helped me figure out how to make the panel and the blocks plus sashing fit together. You will see what we came up with in a future post.

Here are the fabrics I came home with
I made an inner border around the mystery panel, and then I started sewing the sashing pieces. They are actually rather difficult to cut and to sew.
Some of the sashing pieces in bad lighting. 
As I write this blog I am taking a good look at the sashing photo and the realization is dawning on me that I have probably pressed the sashing the wrong way. I don't think I can simply press them the other way because some of the seams overlap. I will have to see how it looks next to the batting. 

This is what happens when you are talking to your friends while sewing and working without a pattern or directions. :(

It wasn't all bad.

Susan M fixed a jacket. She shortened the sleeves and embellished it with molas!
 

Marilyn started a purse. She had some gorgeous Laurel Burch fabric.

Rebecca made a couple of blankets.

Sophia made progress on an adorable Elizabeth Hartmann quilt.

Susan DL experimented with knitting a kippah. Not a smashing success, but wouldn't it make a smashing tea cozy?


Now that I have started my project, I hope there will be enough momentum to keep me going without my support group.


Wednesday, January 9, 2019

A Revealing Feeling - Good Fortune, Parts 7 and 8


Bonnie Hunter revealed the full design of the Good Fortune Quilt this week after surprising us with Clue 7 a few days earlier. It's stunning. It's wonderful. I feel so fortunate to be a part of this quilt-along.

But, I now have a lot of work to do. I have to finish Clues 1-7. Then I can start on the two blocks and four borders described in The Reveal. Bonnie's finished quilt looks amazing. I am really motivated to press ahead and finish mine, but it will have to wait until I get back from my next trip.

I did a tiny fraction of Clue 7. This involved making lots of double pieces by sewing two pieces from Clue 2 together. In addition, we have to make a small number of quad pieces made with pieces from Clue 2. Here are some of the quad pieces:
Clue 7 also called for making some quad pieces with pieces from Clue 1.

Clue 7 went a little faster because there was no cutting involved, but I did make another trip to a fabric store this week, and that took up some time.

Now, before I go on, I want to talk about a New Thing. During this quilt I started listening to podcasts. That's a New Thing for me. I'm really enjoying it. My daughter recommended Serial, so I started with that. Then I added Lexicon Valley, because I love words and linguistics. Then I found a few more interesting ones. Then I got the idea that there might be podcasts about quilting, and I found several! These are some that looked interesting:
  •  Quilting . . . . for the rest of us
  •  Sit & Sew Radio
  •  The Off-Kilter Quilt
  •  Just Wanna Quilt
These quilting podcasts are not professionally produced (I assume) but they are something fun to listen to while I am quilting. Do you have any favorite podcasts?

OK, back to the Good Fortune Quilt. I didn't have a lot of time to work on it this week. I couldn't do much without finishing some of the previous clues, so the first thing I did was to finish Clue 1 completely. Then I decided to make one sample each of the two blocks shown in the Reveal. 
 
Here they are:
The Spinning Star Block


The String Chain Block


These blocks alternate in the finished quilt in a checkerboard pattern and the result is wonderful. I like the Spinning Star Block a lot. I'm not so sure about the String Chain Block. I don't think the red and orange work well together. There is not enough contrast for me. However, I think (hope) that when it is all put together and viewed from a few feet away it will look fine.

Please take a look at Bonnie's Link-Up page and check out some of the finished blocks (and even finished quilt-tops!!) that other people have done. It is so much fun to look at them.

Lessons Learned:
  • If you can't sew with friends, sew with podcasts.
  • Procrastination has its rewards. I only had to make 192 pieces for Clue 1, not the 240 originally specified.
  • Doing sample blocks to start is probably a good idea. The blocks are supposed to be the same size. It turns out my String Chain Block is almost 1/4" larger than the Spinning Star, which is the correct size. I need to think about this before I do any more work with the String Chain Blocks or the components thereof.
  • There is treasure at the end of the rainbow! Just be patient and follow it.