Showing posts with label free-motion. Show all posts

Sunday, December 13, 2015

Mug Rug Hugs

I am continuing to cannibalize The Secret Garden. This time I am using it to make mug rugs for some dear friends I will be seeing in January. The entire project was made using leftovers and scraps. I didn't even have to buy the thread.

Here is where I started:
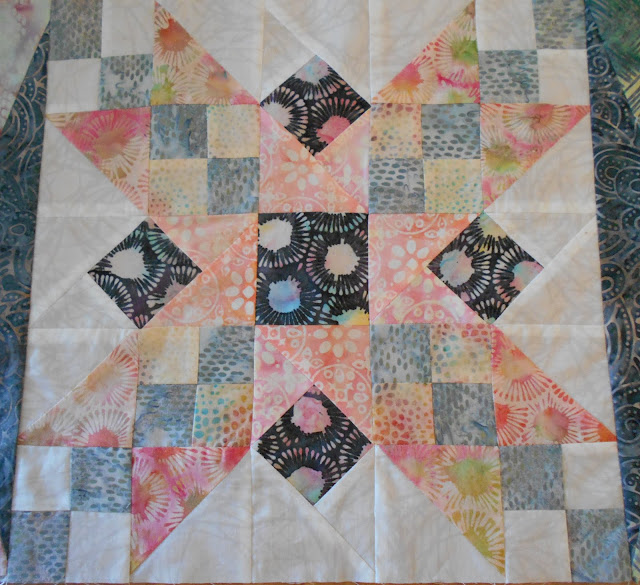

Rocky Mountain Four-Patch Chain block from The Secret Garden.

I ripped out a few seams in this block to remove the four corner squares, which were the perfect size for mug rugs. I then sewed the four cross-pieces together in pairs to make two more squares, and I had the makings of 6 mug rugs.

This project turned out to be a big learning process for me (that's a good thing). I didn't have any directions to follow, so I had to wing it, using what I had learned from other projects. I did a lot of ripping out, but in the end, I let some imperfections go. It was hard to do, but I kept telling myself:
  1. Nobody will notice
  2. Nobody will care
  3. I am being too much of a perfectionist
  4. I have already spent way too much time on this
  5. Why do they have to be perfect anyway?
I used my machine's monogramming capability. It doesn't look as nice as the results you get from a machine with a true embroidery feature, but I wanted a machine that is designed primarily for quilting. I only had to rip out half a monogram. I guess I learned something from my earlier attempts to make labels. It occurred to me, after the fact, that stabilizer might be a good way to go here.

For the actual quilting I tried some straight line quilting, parallel to the "ditch" lines, about 1/4" out. It looked terrible on the back (the side with the monogramming) because it crossed over the monogramming.

Next I tried a stippling or meandering pattern for the free-motion quilting. After doing three I decided I really didn't like the way it looked. In the end I went with a loopy pattern. I have not used this before, but I liked the way it looked. Instead of quilting it from the pieced side, I quilted from the monogrammed side, making sure not to quilt over the monogram.
Loopy quilting
The backing fabric is left over from from some yardage I bought to use in the piecing on the front. The coral backing fabric appears on the patchwork front of some of the pieces. A black companion fabric appears on the front of other pieces. I really like this fabric. The black was provided in the original BOM kits, and I was excited when I found the same 
print in coral.
 
For the binding, I was going to do it the easy way - attach to the back and machine-sew on the front, close to the edge. This looked terrible with white thread. I didn't want to try it with coral thread in the bobbin because I had been experiencing tension problems all through this project and I thought it would look really bad with two different colors if the tension was even the tiniest bit off. 

So, I just sewed the front of the binding down by hand. The white thread shows up too much for my taste, but at the end of a project I always have less patience for ripping out. If I had thought about it, I would have machine-sewn the binding onto the front and hand-sewn it on the back, perhaps using coral thread.
And here they are! I will be making a total of 8.


Lessons learned:
  • Use a stabilizer when monogramming. (I did not.)
  • Don't quilt through monogramming.
  • Thread should match binding. 
  • Take tiny stitches when hand-sewing the binding.
  • Think carefully about whether to attach the binding to front or back, especially if you change your mind about method. 
  • It's harder to do free-motion quilting on a tiny piece than on a fairly large piece.

Thursday, July 23, 2015

Pish Pash

I finished it! The "Pashmina" table runner.
SLM thinks this is why it's called Pashmina
I still have to learn what setting to use on the camera to make my photos of quilting come out well. I had some issues with focus, lighting, and color.

I had to take the closeup photos in three sections:


I used wavy lines for the free-motion quilting. It turned out pretty well. I think my control got better as I went along. Practice, practice, practice. Ideally, I would do all of the quilting in one sitting to maintain consistency, but my arms would probably fall off if I tried to do this - especially on a larger project.

I decided to use the backing fabric for the binding. I thought it would look good.
Backing with matching binding
I'm not thrilled with the way the binding turned out on the front. I didn't realize it would come out looking like the stripes on a barber pole once it had been trimmed and folded into a narrow strip. It does look nice on the back, though.

I tried something new (for me) with the binding. Instead of machine-sewing it onto the front, folding it over, and then hand-sewing it down on the back, I wanted to spare myself the tedious hand-sewing. I machine-stitched the binding onto the back of the project, folded it over, and then machine-stitched it down on the front, very close to the folded edge. That was SO MUCH easier.

I wasn't sure how it was going to look on the back. I don't think it looks that bad. In some places you can't even see the top-stitching. In other places you can see it, but it's on the back, so I can live with it.  
You can see the top-stitching a little bit

If I had matched the thread color better, this might have been less noticeable. As it happened, I just decided to use a color I had on hand. It was close, but somewhat darker than the fabric.
 
Lessons learned:

1. Measure twice, cut once.
2. Relax.
3. Give yourself a realistic but not too distant deadline.
4. A solid color might be best for your binding. Test a print by folding it into a narrow strip.
5. Don't be lazy when it comes to thread color.

Wednesday, July 15, 2015

Simply Elegant Table Runner

Simply Elegant Table Runner. That's the name on the pattern. I actually don't think it's an accurate description of this project. It IS simple, and it IS a table runner, but it doesn't strike me as elegant. I might have called it No-Nonsense Table Runner or Stripped Down Table Runner or maybe Hopscotch Table Runner.

I am using a kit from Timeless Treasures (Tonga Treats line). It came with the fabric and the pattern. The color run I am using (see photo below) is called "Pashmina." 

Pashmina paint
I definitely would not have named this color run Pashmina. "Pashmina" is a "fine quality material made from goat's wool." And - I'll bet you didn't know this - Benjamin Moore has a paint color called Pashmina. I would have called the batik color run Bali Garden or something along those lines.


I started it earlier this year, and then it got put aside while I traveled a bit. Last week I made a commitment to finish it before August 13. 

Yesterday I made the quilt "sandwich" using spray baste and Insul-Bright batting. This is an insulated batting that is perfect for table runners. 

Uh oh! Something went wrong and I didn't have a long enough piece of Insul-Bright. I decided to overlap two pieces and sew them together with a zig-zag stitch. This worked out well, and I don't think it will affect the appearance.
Today I started doing the actual quilting. This is the hardest part for me. 

I am doing free-motion quilting. I am hoping that with practice I will get to the point where I can maintain even stitch length and smooth lines. I'm not there yet. I do hope that Malcolm Gladwell's 10,000-Hour Rule doesn't apply to free-motion quilting. I don't know if I would have the perseverance for that.

It is quite a bit easier with my new sewing machine because it has a speed control, but I'm still trying to figure out the optimal speed. I had it set too slow, and my stitches were all over the place. I set it a little faster and that seemed to help.

Today I did half of the quilting and then realized that my left wrist was almost broken and my left arm was falling off. Did somebody say Advil? I guess I was too tense. I will have to wait a couple of days before I can continue.