Saturday, February 27, 2021

Wading In - Chester Creek, Week 2

December 4, 2020
 
This was a busy week in Quiltville North. Bonnie Hunter released Part Two of Grassy Creek. This Grassy Creek is Bonnie Hunter's annual quilt-along mystery. The task this week was to make hourglass units. 
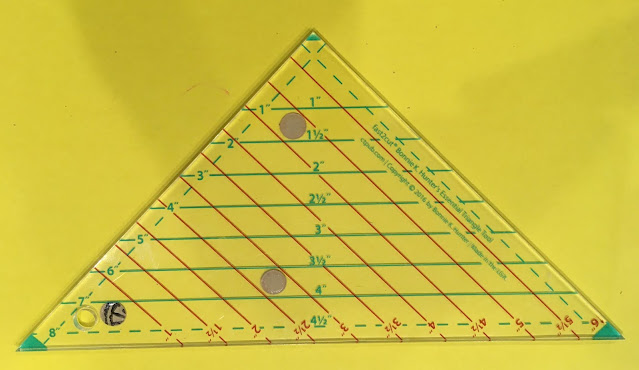
Bonnie offered two methods to make the units. I chose the method that employs Bonnie's Essential Triangle Tool because it is fun and easy to work with.
 
Essential Triangle Tool

 I was experiencing a little slippage while I was using the tool, so I added some sandpaper dots, and that made a big difference.

The sandy side of a sandpaper dot


I made a number of quarter square triangles and then sewed them together to make hourglass units. Bonnie provided very helpful tips for cutting, pressing, and sewing. The center points turned out perfectly! 

I especially liked her suggestion for "spinning" the seam in the center to reduce bulk. Everything went together very nicely. 

Ta da!


Saturday, December 5, 2020

Red Sky at Night

Red sky at night - Sailors delight,

Red sky in morning - Sailors take warning!

 I finally finished it, and it's in the mail! 

I saw this panel in a quilt shop in Ketchikan, and I thought of our friends whose son attends the Coast Guard Academy, so I bought it for them. Then I got the idea that I could make it into a quilted wall hanging before I gave it to them. 

This project turned out to be a lot more complicated than I was expecting, because I had no directions for it. Ultimately, I decided to include three "Storm at Sea" blocks. Then I saw a quilt on Pinterest that had the "Starry Night" blocks, and I loved how they fit in with the theme of the quilt.

Just about every step presented a challenge. The panel was an odd size, so I had to figure out what size to make the blocks and the sashing pieces. Fortunately, I have a set of templates by Marti Michell called "Long Skinny Sashing Stars." I also used Marti's "Set A, The 3" Square Basic Set." My troubles and travails are detailed in my May 15, 2019 post, So Much to Wilt About. Let's just say I learned many important lessons before I was able to get all the moving parts synchronized.

I had to put in a dark red border around the panel. It was narrower on the top and bottom than on the sides, but that's the only way I could get the panel to fit.

My quilt buddy, Susan, came with me to The Quilt Tree to help me pick out the fabric, after I had the basic plan sketched out. The nice lady at The Quilt Tree helped me figure out how much of each fabric I needed. I think we did a good job! I still like the fabric a lot, despite all my frustrations with this unruly project.

This photo of the back gives a you a better idea of what the black batik on the outermost border on the front really looks like.


On the photo of the back you can also see the dark red binding (hand sewn), the hanging sleeve (made out of the blue-violet batik I used on the front), and the label.


If you squint, you can see some of the machine-quilting I did. I used a variegated blue thread. In retrospect, that turned out to be a poor choice. I went through so many quilting scenarios in my head. Most of them turned out to be too difficult for someone like me, so I ended up with something fairly simple.  I eventually realized that I did not need to be overly concerned with stabilizing the batting, since this will be a wall hanging. After much debating with myself, I determined that it would be best to leave the panel unquilted. It has a rubbery coating that would be very difficult to work with, and I couldn't settle on a good quilting plan for the panel (Outline the pictures? Geometric pattern?).

I ended up stitching-in-the-ditch around the blocks and the sashing. Then I did a free-hand serrated line of stitching in the outer black border to echo the serrated edge of the stamp in the panel. I wish it were visible in the photos.

Even the label was tricky. I had to think very carefully about the cleaning instructions. I was going to say "Dry Clean Only,"but the rubbery coating on the panel gave me pause. I think some of the ink/paint started to come off when I ironed it. I also had reason to think the yellow fabric might run. And I really didn't want the batting to shrink on this piece.

Lesson Learned: Don't do this again.


Friday, November 27, 2020

Getting My Feet Wet, Thinking Local - Chester Creek, Week 1

There's a special feeling that comes with starting a new project. You have a clean slate and high expectations. I don't know what this quilt will look like - hence, the mystery - but I know it will be beautiful and I know the directions will be clear and precise and helpful.

My new project is Bonnie Hunter's 2020 Mystery Quilt-along. She has called it Grassy Creek, as she was inspired by a  creek of that name near her home in southern Virginia. Mine quilt is going to be called Chester Creek, for the creek nearest to me.

Screw you, Covid-19. I'm going to have fun staying at home and sewing. I have managed to get the fabric I need via mail-order (thank you Missouri Star), and I have put a new blade in my rotary cutter and would several bobbins. I even have new clips to keep the threads on my bobbins from unwinding. I have tried several different things to solve this problem and nothing has been satisfactory. I think these are going to work. 😊

The problem

The solution

What will Bonnie Hunter tell us to make first? Half-square triangles, using the golds and the greys! She offered several cutting methods. I chose to use the method which employs her Essential Triangle Tool. It seems to be the easiest.

Essential Triangle Tool

I really like the Essential Triangle Tool, but I did notice that it tended to slip when cutting a stack of four strips. I decided to add some sandpaper dots, and that seemed to lessen the GC 1-5slippage.

Sandpaper dot closeup
 

Another problem I encountered was the difficulty of cutting relatively narrow strips from the ends of the various one-yard cuts of fabric I was working with. In the past, I have generally worked with 1/4-yard cuts and I did not have to worry about cutting such lengthy strips. But this year, I had to order from Missouri Star and they have a 1-yard minimum for yardage. If I did another quilt like this, I would probably cut the pieces into 1/4-yard cuts before starting.

My third challenge was getting the finished size right. Bonnie Hunter said the seams should be "scant," but I usually ended up with finished squares that were too large, so I just sewed my regular 1/4" seams - which was easier to do - and my pieces ended up correctly sized.

Despite these minor issues, I finished Part 1 easily, and the pieces ended up looking very nice.

Part 1 pieces

Ta da! (Clue) One and done!


Thursday, November 26, 2020

Chester Creek


Bonnie Hunter has released the colors for her 2020 Mystery Quilt-Along. Link to Bonnie Hunter's Mystery here: Grassy Creek - A Quiltville Mystery (Introduction!)

Bonnie's colors were inspired by the countryside surrounding her home in the Blue Ridge Mountains. For the first time, I am going to deviate from Bonnie's colors. I am going to take my inspiration from the creek and forest near my home in Alaska. 

 We don't have a lot of reds and oranges in the woods here, so I am going to replace Bonnie's red with a plummy purple, and I will replace her orange with a dark, bluish green. I will stick with the other colors Bonnie chose: gold, yellow-green, white, and gray.

I will not be going into shops at this time. I ordered all of my fabric from Missouri Star Quilt Company. They got it here very quickly. I had to buy pieces which were a minimum of one yard, so that meant fewer different fabrics. The result will be less scrappy, but it will still be scrappy enough, I think.

It is a little hard to get the colors right when you order on line. I had to let go of my usual obsession with finding the exact shade. I am forced to accept a wider range of tones within each color group. I think this will be good for me.

Golds 


Yellow Greens


Dark Greens


Plums


Grays

 
Whites 


This time around I decided to take the time to pre-wash my fabric. Even though it is all high quality fabric, I have concerns about colors running and fabric shrinking. I washed the fabric in warm water and dried it in a medium dryer. 
 
You wouldn't believe the amount of unraveling that happened. I started out sewing a basting stitch about  1/4 inch from the edge. It didn't seem to prevent unraveling. I ended up sewing a zig-zag stitch as close to the edge as possible. It still unraveled a lot.
 
And it shrank. I didn't measure it scientifically, before and after, but each one yard piece seems to have shrunk about two inches. Some of that may resolve itself when I iron the fabric. This makes me worry about some of my previous projects. Most of those are unfinished, and most were not pre-washed. How will the fabric behave once it has been cut into small pieces and sewn to other small pieces? Should I worry? 
 
Well, I am really excited to begin this mystery quilt. Tomorrow is the day the first clue will be revealed!


Monday, May 25, 2020

A Little of This and a Little of That

Sunday, May 24

Loops and Lycra

I have been provided with some useful information about the ratio of stretchy trim to base fabric: it should be 2 to 3. (Thanks, Gayle!) This piece of information came in handy because I wanted to make myself a mask with ear loops instead of ties so I could get a haircut.

It took some doing, but I finally completed it. I cut a 1-inch wide strip of lycra, then folded it in half and stitched the sides together using the multiple zigzag stitch. Why did I bother with stitching the ear loop? I don't know exactly. It seemed to give the piece more stability without sacrificing too much stretchiness. (See my previous post, Loopla!, for more on lycra ear loops.)

My "Haircut Mask" was made with Kaffe Fassett fabric for the front and for the filter pocket. The back, underneath the pocket, was just some generic orange polka dot fabric I had. I encased one of the new nose bridges (explained below) in between the filter pocket and the back. It will be relatively easy to get to it, if it breaks.

Haircut Mask
The fabric is Leopard Lotus Ochre by Philip Jacobs from the Spring 2016 Kaffe Fassett Collective.


Filter pocket of Haircut Mask
 The fabric is Pink Tree Fungi by Philip Jacobs from the
Fall 2016 Kaffe Fassett Collective

I love this mask, and it goes on and off so quickly and easily.

Unfortunately, it is very difficult to sew a zigzag stitch on a narrow little strip of Lycra.
First I had to change needle plates, which involves a screwdriver. For regular sewing I prefer to use the Straight Stitch Needle Plate, because it doesn't jam. However, for zigzag stitches it is necessary to use the "Standard" Needle Plate, which has a wide hole so the needle can zigzag from side to side. Then I forgot to take off the Standard Needle Plate before I started sewing the regular fabric again.  Oy, did it jam. I couldn't get the fabric out until I unscrewed the plate and took it off.

For those of you who may not be sewing-literate, this is what the Standard Needle Plate (aka throat plate) looks like:
Standard Needle Plate

And this is the hole that eats your fabric:
The Straight Stitch Needle Plate has a different configuration of holes:
Straight Stitch Needle Plate

Long story short, my beloved Janome is now in the shop. I managed to damage the needle plate while trying to un-jam it. She was way overdue for routine maintenance in any case.

And I want to end this segment by saying that I have also been reminded to use a stretch or ball-point needle when sewing on lycra. I didn't. Maybe that would have made it easier. And maybe I should have lowered the feed dogs. This whole adventure has been one experiment after another.

Locks and Laces

Meanwhile, my daughter received a mask that she really likes because it goes on quickly. It has ties made of plastic lanyard lacing. We used to call it "gimp," and we  made lanyards with it at camp. What her mask has actually looks a little wider and more flexible than standard lanyard lace.

The lacing goes through a channel on each side of the mask, so you don't have to worry about sewing through a very narrow piece of plastic.


The really cool thing about this mask is the cord lock toggle that is used to quickly adjust and tighten the ties. You only need one per mask.


Based solely on the photos, I don't really think this is the same exact material campers know and love. You can't see the knots well, but they don't look like the gimp knots that always came undone due to the stiffness and lack of friction I remember from my camping days.

Whatever. I will figure the ties out later. I'm thinking t-shirts might work. In order to be able to experiment, I ordered some cord locks (and they came in just a few days🤗). I was able to get a package of 25 cord locks for $7.29. That works out to about 29 cents apiece. Very reasonable.


A Bridge to Nose-wear

Susan C presciently ordered a bunch of nose bridges very early on in our new lives as mask makers. She was kind enough to share them, and I got two dozen to play with while I waited for my order to arrive.


I placed my order for the same type of nose bridge  on April 27. It was a little late in the game, but I carefully chose a supplier (through Amazon) who looked to be able to get them shipped quickly. As soon as I placed the order the expected arrival date changed to a later date. I kept checking the tracking feature and the arrival kept getting pushed back, until the product finally showed up as "currently unavailable." After almost a month, the tracking feature informed me I could request a refund. I did so yesterday, and the seller promptly responded agreeing to give me a refund. An email from Amazon confirmed this, but I want to see it on my credit card.

I did consider not cancelling the order, but Susan C reported that she was finding the pieces rather flimsy, and one of them had broken inside a mask during washing. I think I will get the plastic-covered wire nose bridge strips instead, but I will probably have a long wait.

My Latest Labors

My mask group is working on some masks for the synagogue, in case people show up without a mask. The idea is that people who don't have a mask can keep one. But people who already have one at home should leave them at the synagogue. We are still figuring out a system to collect these weekly and wash them.

Speaking for myself only, I work much too hard on these masks to have them be taken as a souvenir, or because they are "free," or because they are nicer, or because we forgot and walked out wearing it. They are not intended to be throw-away items. So, my solution to this "problem" is to use up some this ugly Judaica fabric that I've had forever. I am halfway through a set of these masks. I will finish them when my Janome comes home.


I also made a pair of masks for one of my cousins in California. She didn't get the sewing gene, apparently. Her masks got the full treatment, with nose bridges and filter pockets and pretty fabric.


The fabric on the top mask is May Purple Fireweed Bali Batik, by Alaskan artist Dana Michelle, from the Into the Wild collection, by Hoffman Fabrics. The fabric on the bottom mask is Red Guinea Flower, from Kaffe Fassett.


The filter pocket on the top mask is a batik. The filter pocket on the bottom mask is Leopard Lotus Orange by Philip Jacobs from the Spring 2016 Kaffe Fassett Collective.   


Now I just have to figure out what I'm going to do with those cord locks. And make about 50 more masks.


Thursday, May 7, 2020

Loopla!

Elastic is very hard to come by these days. In the beginning of "hunker down" I made a few masks for my husband using ponytail holders for the ear loops. They are hard to sew because they roll, and I only have enough for about 7 or 8 masks. (I don't know how hard it would be to get more.)
One of my early masks, using ponytail holders

I tried out one of these masks and I found the ponytail holders to be very uncomfortable for more than 5 seconds. Perhaps it was one of my earlier masks. They were quite narrow - between 5" and 6" wide. I am making them 7" to 9" wide now. That would have made a difference in how tight the loops felt.

But working with the Lycra-type fabric gave me an idea. It is so stretchy. I wondered if I could use it in place of elastic. It would be more comfortable than ponytail holders, and easier to sew.

My finished product is this mask, which I have named "Aurora." I had a few false starts and ended up ripping out every seam at least once. But ultimately, it was a success!
Aurora
I wasn't sure how long to make the loops. It seems that there would not be one standard measure because different loop materials have different levels of elasticity. It also depends on the width of the mask and on the wearer's face. 

I started out with 6" x 1" strips of Lycra (unstretched). I made up a prototype mask, basting the seams, and it was tried on, and slight adjustments were made. I ended up with 5 ¾" x 1" strips of Lycra.

Sample zigzag stitches on folded Lycra strip
I also wasn't sure whether to fold the Lycra in half and sew it, or fold it in half where it is sewn into the seam without sewing it, or not fold it at all. I ended up folding and sewing it. It seemed to need the stability. I used a stitch called multiple zigzag stitch or tricot stitch. It was hard to sew a straight line in this stitch on a 1" strip folded in half, but it was good enough for my purpose. The multiple zigzag stitch did not seem to limit the ability of the loop to be stretched. By contrast, a regular zigzag stitch worked poorly. It inhibited the stretching and it caused the piece to curl up.

Close-up of finished loop
The filter pocket on the other side of the Aurora mask
I made a filter pocket for the Aurora mask using a method I had seen on the internet. The method requires two full size pieces of lining that you sew together in the center, leaving a gap in the middle. You then fold the ends of each piece together and you have a pocket with finished edges.

I do not recommend this method for two reasons. First, it is difficult to insert a filter. (Maybe I should have made the gap wider.) Second, when the mask is worn without a filter, speaking seems to open up the gap, resulting in only a single layer of fabric near the mouth. This would be worse with a wider space for inserting a filter.

To recap:
  • Lycra loops are a good substitute if you don't have elastic but you do have Lycra.
  • They are very comfortable.
  • You may have to adjust the length for different masks or different wearers. (Maybe you have to do that with elastic loops, too?)
  • They are easier to work with than ponytail holders, especially if you elect to skip the zigzags.

Monday, May 4, 2020

It's the Berries!


I was excited to get some Lycra-type fabric from Leah, because that is what the mask pattern I want to try next calls for. "Lycra" is a trademarked name, and I don't know if the fabric I got is actually Lycra, but I don't have another name for it. It is extremely stretchy.

The mask pattern I want to try comes from a company called EldenberryBlossoms. That's "Eldenberry" with an "n", no space, "Blossoms." This pattern is almost impossible to find using Google, so I will just tell you to go to the Facebook page for "EldenberryBlossoms Pattern Group," and ask to join the group. When you have been approved you will be given access to "Files" and you will be able to find the mask pattern there. I will call it the EB mask from here on.

The EB mask is similar to the fitted mask, but it uses something stretchy along the top and bottom edges. I was hoping this would help it to fit the face more snugly. Specifically, I am trying to address the problem of glasses fogging up.

I had previously made one Eldenberry mask using t-shirt strips. It turned out ok. I thought it might turn out better with Lycra.

Inevitably, you will find some aspect of the pattern that you want to change. For me, it was the ties. The pattern said the ties should be16-24". I thought that was a little short, since I make the ties 16" long on each side when I make other styles of mask.

In theory, the EB mask is an easy mask to make. You cut two outsides and two insides and two long 1½" Lycra strips. You sew the center seam on the inside and the outside. You machine hem the four side edges. You sew the tops and one  Lycra strip together with a single seam, then repeat for the bottoms. Turn it right-side out and you are done. No top-stitching. Practically no ironing.

So why does it take a couple of hours to make one? 
  • Part of it is my perfectionism. 
  • Most of it is that it's hard to sew the long seams with the Lycra pieces. You have to stretch the Lycra while you are pinning/sewing. As soon as you let go, both the sewn and unsewn parts want to spring back and bunch up. The fabric wants to slip, and you end up with a seam allowance on the underside that might be too narrow. The stretching is uneven. 
  • Lycra is hard to cut into long strips. 
  • You might forget to hem the sides. 
  • It's harder than you'd expect to remove stitches from the Lycra and the stretched fabric. 
And so on. It was berry frustrating.
Ta dah!


With the EB mask pattern there is a slight difference between the top and the bottom of the mask. It is hard to see on a finished mask (or on an unfinished mask), but it makes a difference in how the mask fits. One way to deal with this is to use fabric with a directional print.

I do worry a little about the aqua mask. The blue Lycra was much stretchier than the black Lycra, and I may in fact have stretched it too much. I will have to wait for feedback from Spokane (where these two masks are headed). 

I made the rust-colored mask first, and I measured the Lycra without stretching it. My 24" ties seemed a little on the short side, so when I made the aqua mask I sewed two strips together to make longer ties. I used a stretch needle and a zigzag stitch to do this. As it turned out, the blue Lycra was so much stretchier than the black that it probably wasn't necessary to sew two strips together. But I didn't realize that until later. 

So, I had a big lump where the two pieces of Lycra were sewn together. I decided to stretch the tie out so that the lump was not part of the seam. Instead, the lump was next to the fabric.

This is not a mask a perfectionist would make.

If I do this again, I will try joining the ties with a diagonal seam.

I noticed a lot of tiny threads or beads of Lycra while I was working with it. I hope the ties won't continue to unravel over time.

On the plus side, I think these masks will fit their intended recipients well. The pattern comes in four adult sizes and three youth sizes. 

The EB Mask gives you an automatic filter pocket. There is a template for filters in the Facebook "File" mentioned above.

I am going to withhold judgment on this mask until I get feedback from Spokane.

And just for fun, here are the two fitted masks that went out to Spokane in the same package.